
 Try for free
Blog
How to Manage Custom and Made-to-Order Orders on Shopify
What Shopify gives made-to-order sellers, where its Orders list stops, and what Orderline adds, step by step.
Written by Subhendu Singh · Published · Updated
On this page
- The short answer
- Part 1: What Shopify gives you
- Step 1. Capture options at checkout (product options apps)
- Step 2. Offline and phone jobs: Shopify draft orders
- Step 3. Filter custom work with tags and Shopify Flow
- Step 4. Put personalization on the packing slip
- Step 5. Fulfill only when the work matches the line
- Part 2: Where Shopify hits its limits
- 1. You open every order to see what to make
- 2. Personalization is not visible on the list
- 3. Product images are missing from the list
- 4. "Unfulfilled" does not tell you where work is
- 5. Every order gets the same deadline
- 6. Default columns are often not enough
- 7. Multi-channel sellers need channel views
- 8. Pickup store vs workshop
- Part 3: What Orderline adds, step by step
- Step 1. See every order's details in one place
- Step 2. Move work through your own production statuses
- Step 3. Sort by a ship-by date
- Step 4. Add your own columns
- Step 5. Save views, including by sales channel
- Step 6. Route work between pickup store and workshop
- Step 7. Print bulk packing slips (Production manifests)
- Step 8. Internal notes on orders
- Step 9. Fulfil directly from Orderline
- Frequently asked questions
- Do I have to click into every order to see what the customer chose?
- Does the Shopify order export include the customizations?
- Can I add production stages beyond Unfulfilled and Fulfilled?
- Can different items on one order be at different stages?
- Can I set a different ship-by date for each order?
- How do I print the customizations on the packing slip?
- Can my staff see only the orders for their location?
- Do I need an app at all?
- What to do this week
- Sources
Whether you handcraft engraved jewellery, stitch embroidered apparel, craft leather goods, shape custom signs, or build solid wood furniture, your mornings probably start with the same tedious routine. You sit down with a cup of coffee, open your Shopify orders dashboard, and start clicking into orders one by one. You read the notes to figure out what ring size to cut, what name to engrave, or what stain color to use.
Shopify’s Orders list is built so you can quickly scan the fulfilment status, payment status and shipping details of each order. It works well for the merchants selling stocked products, ready to go.
Shopify’s order screen, however, falls short for the made-to-order or built-to-order merchants as it doesn’t display the exact line items ordered with customizations. For that, you have to click into each order to check what ring size was ordered, which color fabric was chosen or what’s the engraving text. These details should be present in front of your fulfilment staff when they are preparing the orders.
This guide walks through three parts. First, we look at what Shopify gives you, including options apps, draft orders, tags, Shopify Flow, and packing slips. Next, we look at where it hits its limits. Finally, we break down what Orderline adds, step by step, with each step pointing you to a deeper guide.
The short answer
- An order management system for made-to-order should do these jobs: show line items with customizations in one view, manage production stages and add ship by order deadlines.
- Shopify plus an options app, draft orders, tags, Flow and a packing slip that prints properties covers all five at low volume.
- The Orders list still hides personalization and product images and has no production stages. Its Fulfill by column follows one shop-level processing-time rule, so you can’t set a date or rule per order.
- Orderline adds one production view: images, line items and customizations together, custom statuses, ship-by dates, custom columns, saved views and bulk packing slips.
Part 1: What Shopify gives you
The following steps tell you how you can capture the customizations from your shoppers on orders received through your online shop and offline via phone call.
Step 1. Capture options at checkout (product options apps)
Standard options like size and color fall short when you need open text for engraving, exact layout placement, thread shades, or uploaded vector files. That is why line item properties matter, acting as custom name and value pairs locked right to the order line (Shopify line item documentation). Product options apps place extra input boxes on your product page so shoppers type in their details before buying, sending those choices straight into your dashboard.
| App | Role for custom sellers | Notes (re-check listing) |
|---|---|---|
| Infinite Product Options (ShopPad) | Text fields, dropdowns, conditionals, add-ons; selections included on the order in Admin | Built for Shopify; lists Order Printer among integrations; ~$12.99/mo with trial |
| Aco – Product Options & Addons | Drag-and-drop options, uploads, dynamic pricing | Listed among apps Orderline works with on the Orderline App Store page |
| Easify Product Options (and similar) | Form-style options when you need another form builder | Category alternative; verify it writes line properties, not only cart notes |
Choose just one options app for your storefront depending on which one allows you to configure the type of inputs you need like text (engraving), images (logo) etc. After configuring the product options app of your choice, place a test order and see if Engraving, Font, or Thread color are stamped directly onto the line items.
If you decide to use Infinite Product Options, you can set it up smoothly by following these instructions:
- Install Infinite Product Options and complete your theme setup. ShopPad provides guides for automated and manual theme steps on Online Store 2.0 frameworks like Dawn, and remember that switching your theme usually means you need to toggle the app embed back on.
- Build an option set for an actual custom item you sell, using clear internal names like
Engraving,Font, andGift noteinstead of confusing marketing labels. - Link that option set to the right products in your catalog.
- Buy a test item from your own store, typing clear dummy text like
TEST-ENGRAVE-123into the fields. - Head over to Shopify Admin, open up your Orders list, select that test order, and look closely to verify every single choice shows up right under the item line.
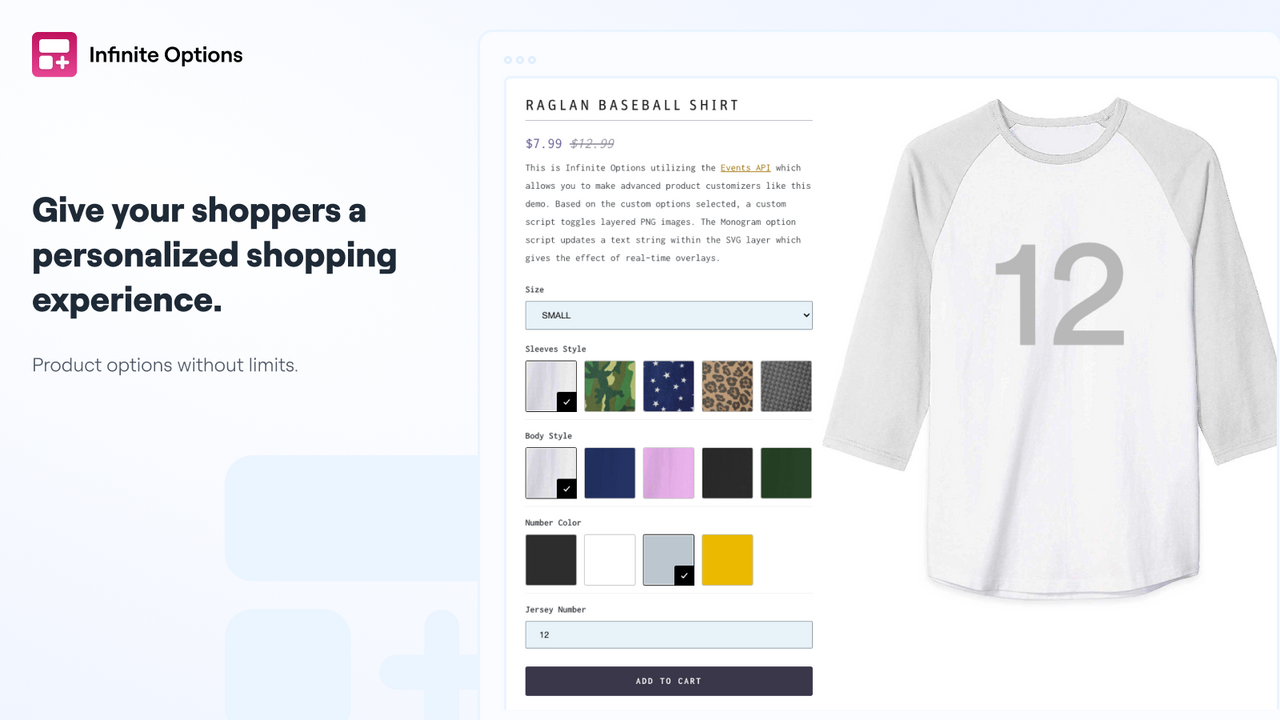
Infinite Product Options storefront personalization example from the public App Store listing
Any person on your team can open up a paid order and read every custom detail without needing to chase people down on Slack or email. If you are still comparing tools, look at the Top 6 Shopify Product Options Apps.
Step 2. Offline and phone jobs: Shopify draft orders
When sales happen over the phone, via email, through wholesale, or in person, buyers skip standard web checkouts. To log these sales manually, use the draft order builder in Shopify (Shopify Help: creating draft orders).
- Go to your Shopify Admin and click Orders → Drafts → Create order.
- Pick an existing catalog product if the item is part of your normal lineup.
- Click Add custom item for one-off charges or custom items not in your shop. Keep in mind that Shopify makes these custom items show without a product image or a clickable product title, which can complicate shipping automation, so use real catalog items when you can.
- Type final sizes and notes in the internal note box, and add a tag like
custom-quote. - Send out the bill or mark it paid. Once paid, the order moves straight to your fulfillment list (draft orders overview).
For example, a custom leather order starts by adding the base bag and a “Rush pattern fee $25” custom item. Next, you write “Left strap +2 cm” in the notes and tag it custom-quote. Finally, you send the bill and check the details before you cut leather.
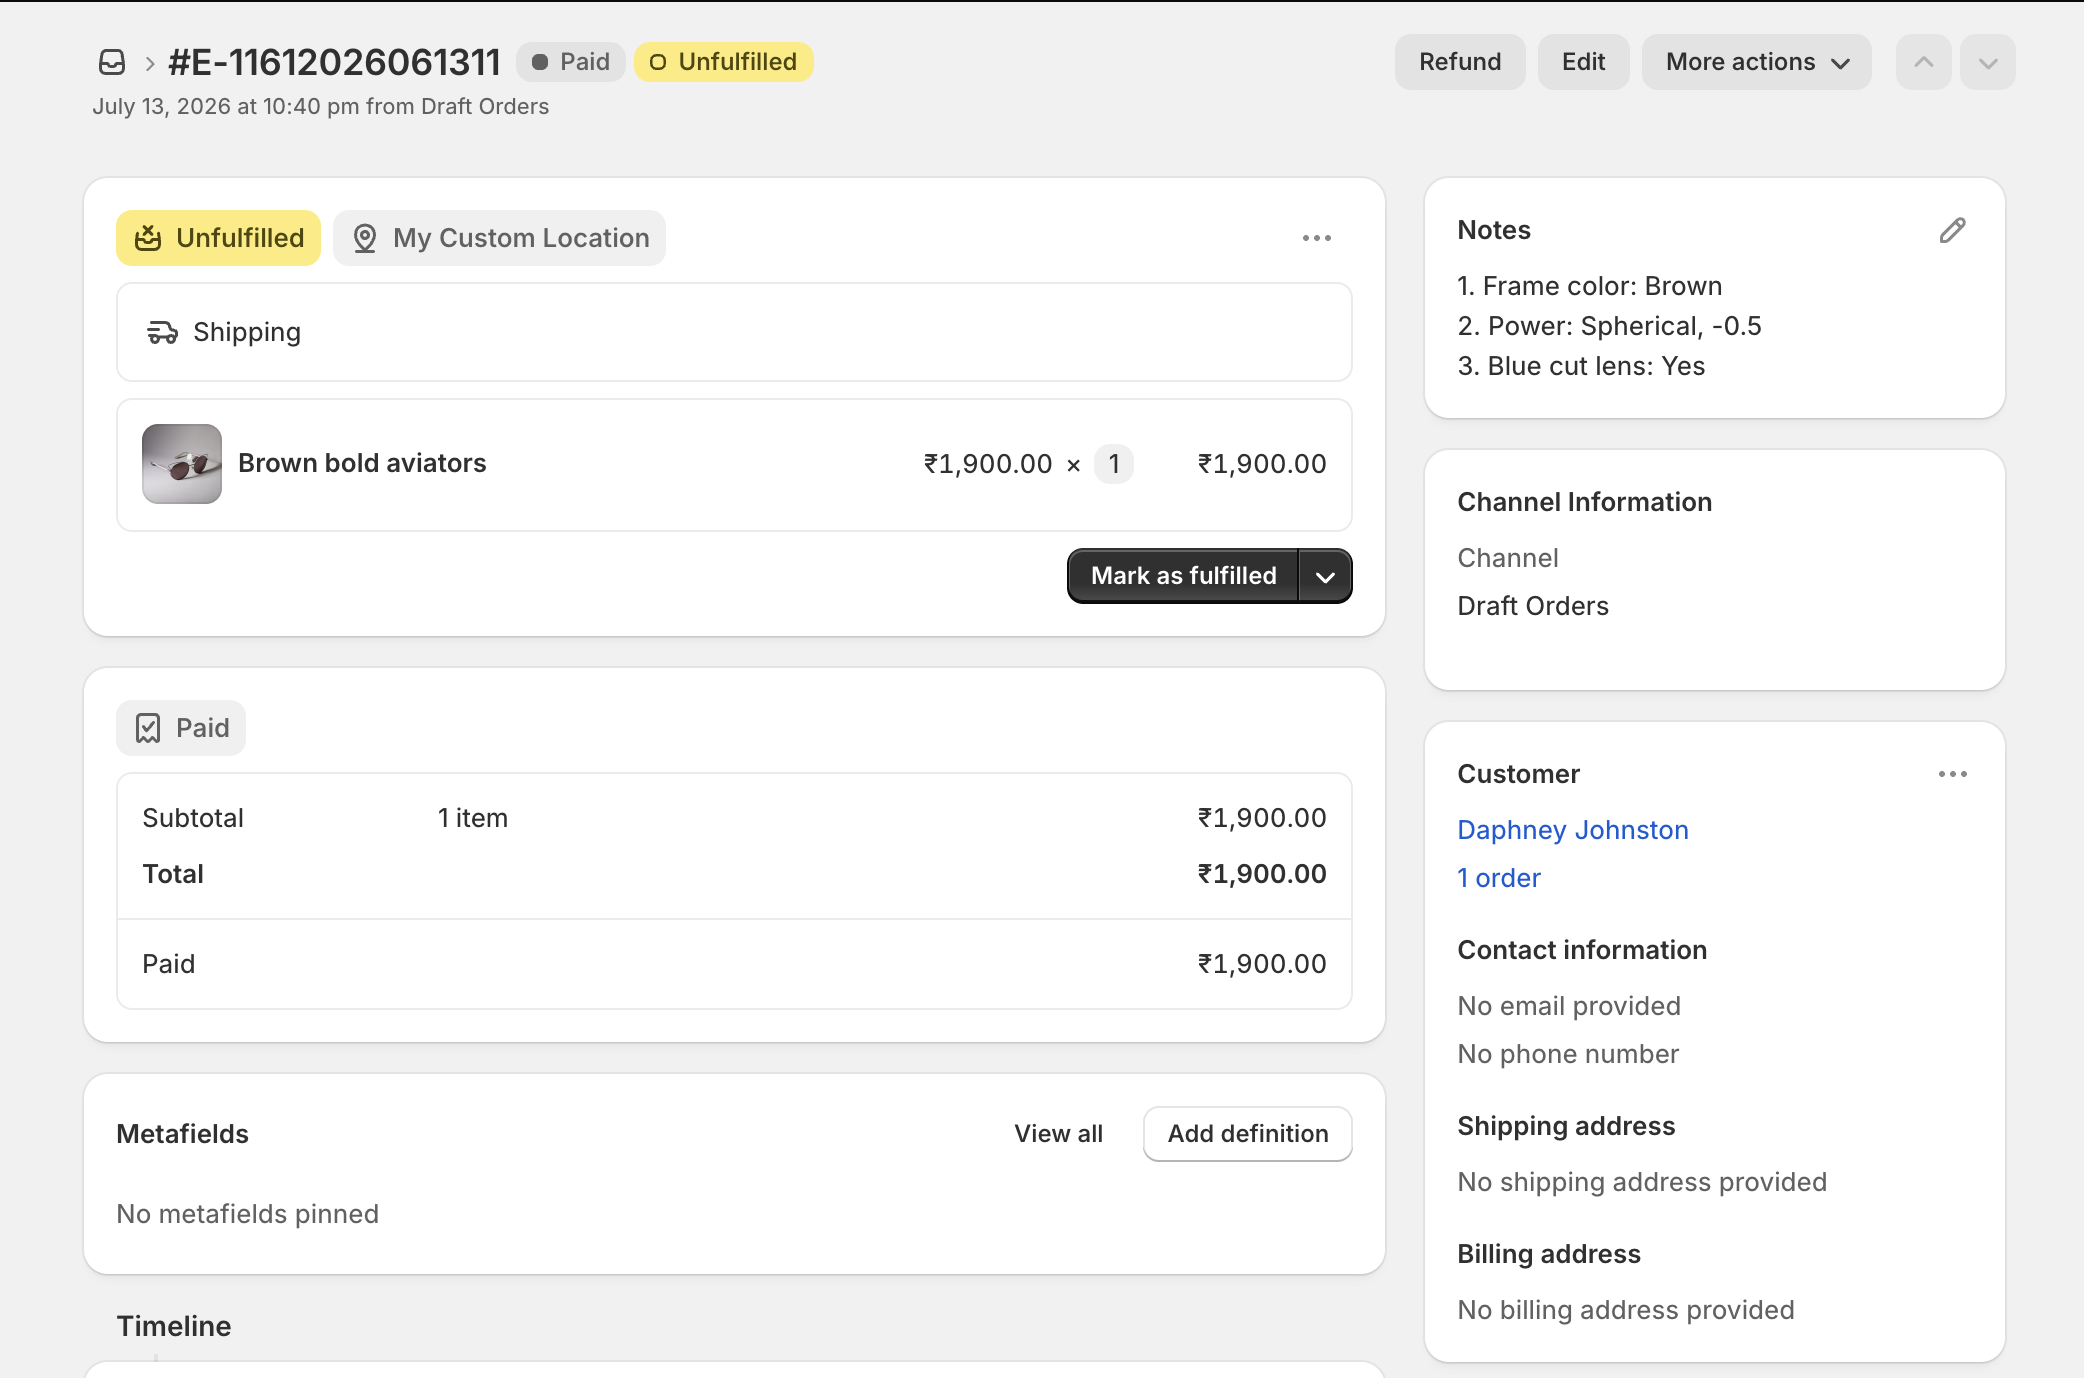
Shopify draft order with personalization and production details captured in the note field
Shopify draft order: when the sale is offline, put the final approved customizations in a note you treat as authoritative before you send the invoice.
Having all production details right on the order record, instead of lost in old email threads, keeps your team on track.
Step 3. Filter custom work with tags and Shopify Flow
Tags cannot hold long text, but they help you sort custom workshop tasks from standard items.
- Open any order in your Shopify Admin dashboard.
- Add simple tags like
custom,rush,proof-hold, orcustom-quote. - Filter your main order view by these tags and fulfillment status to keep your daily queue clean.
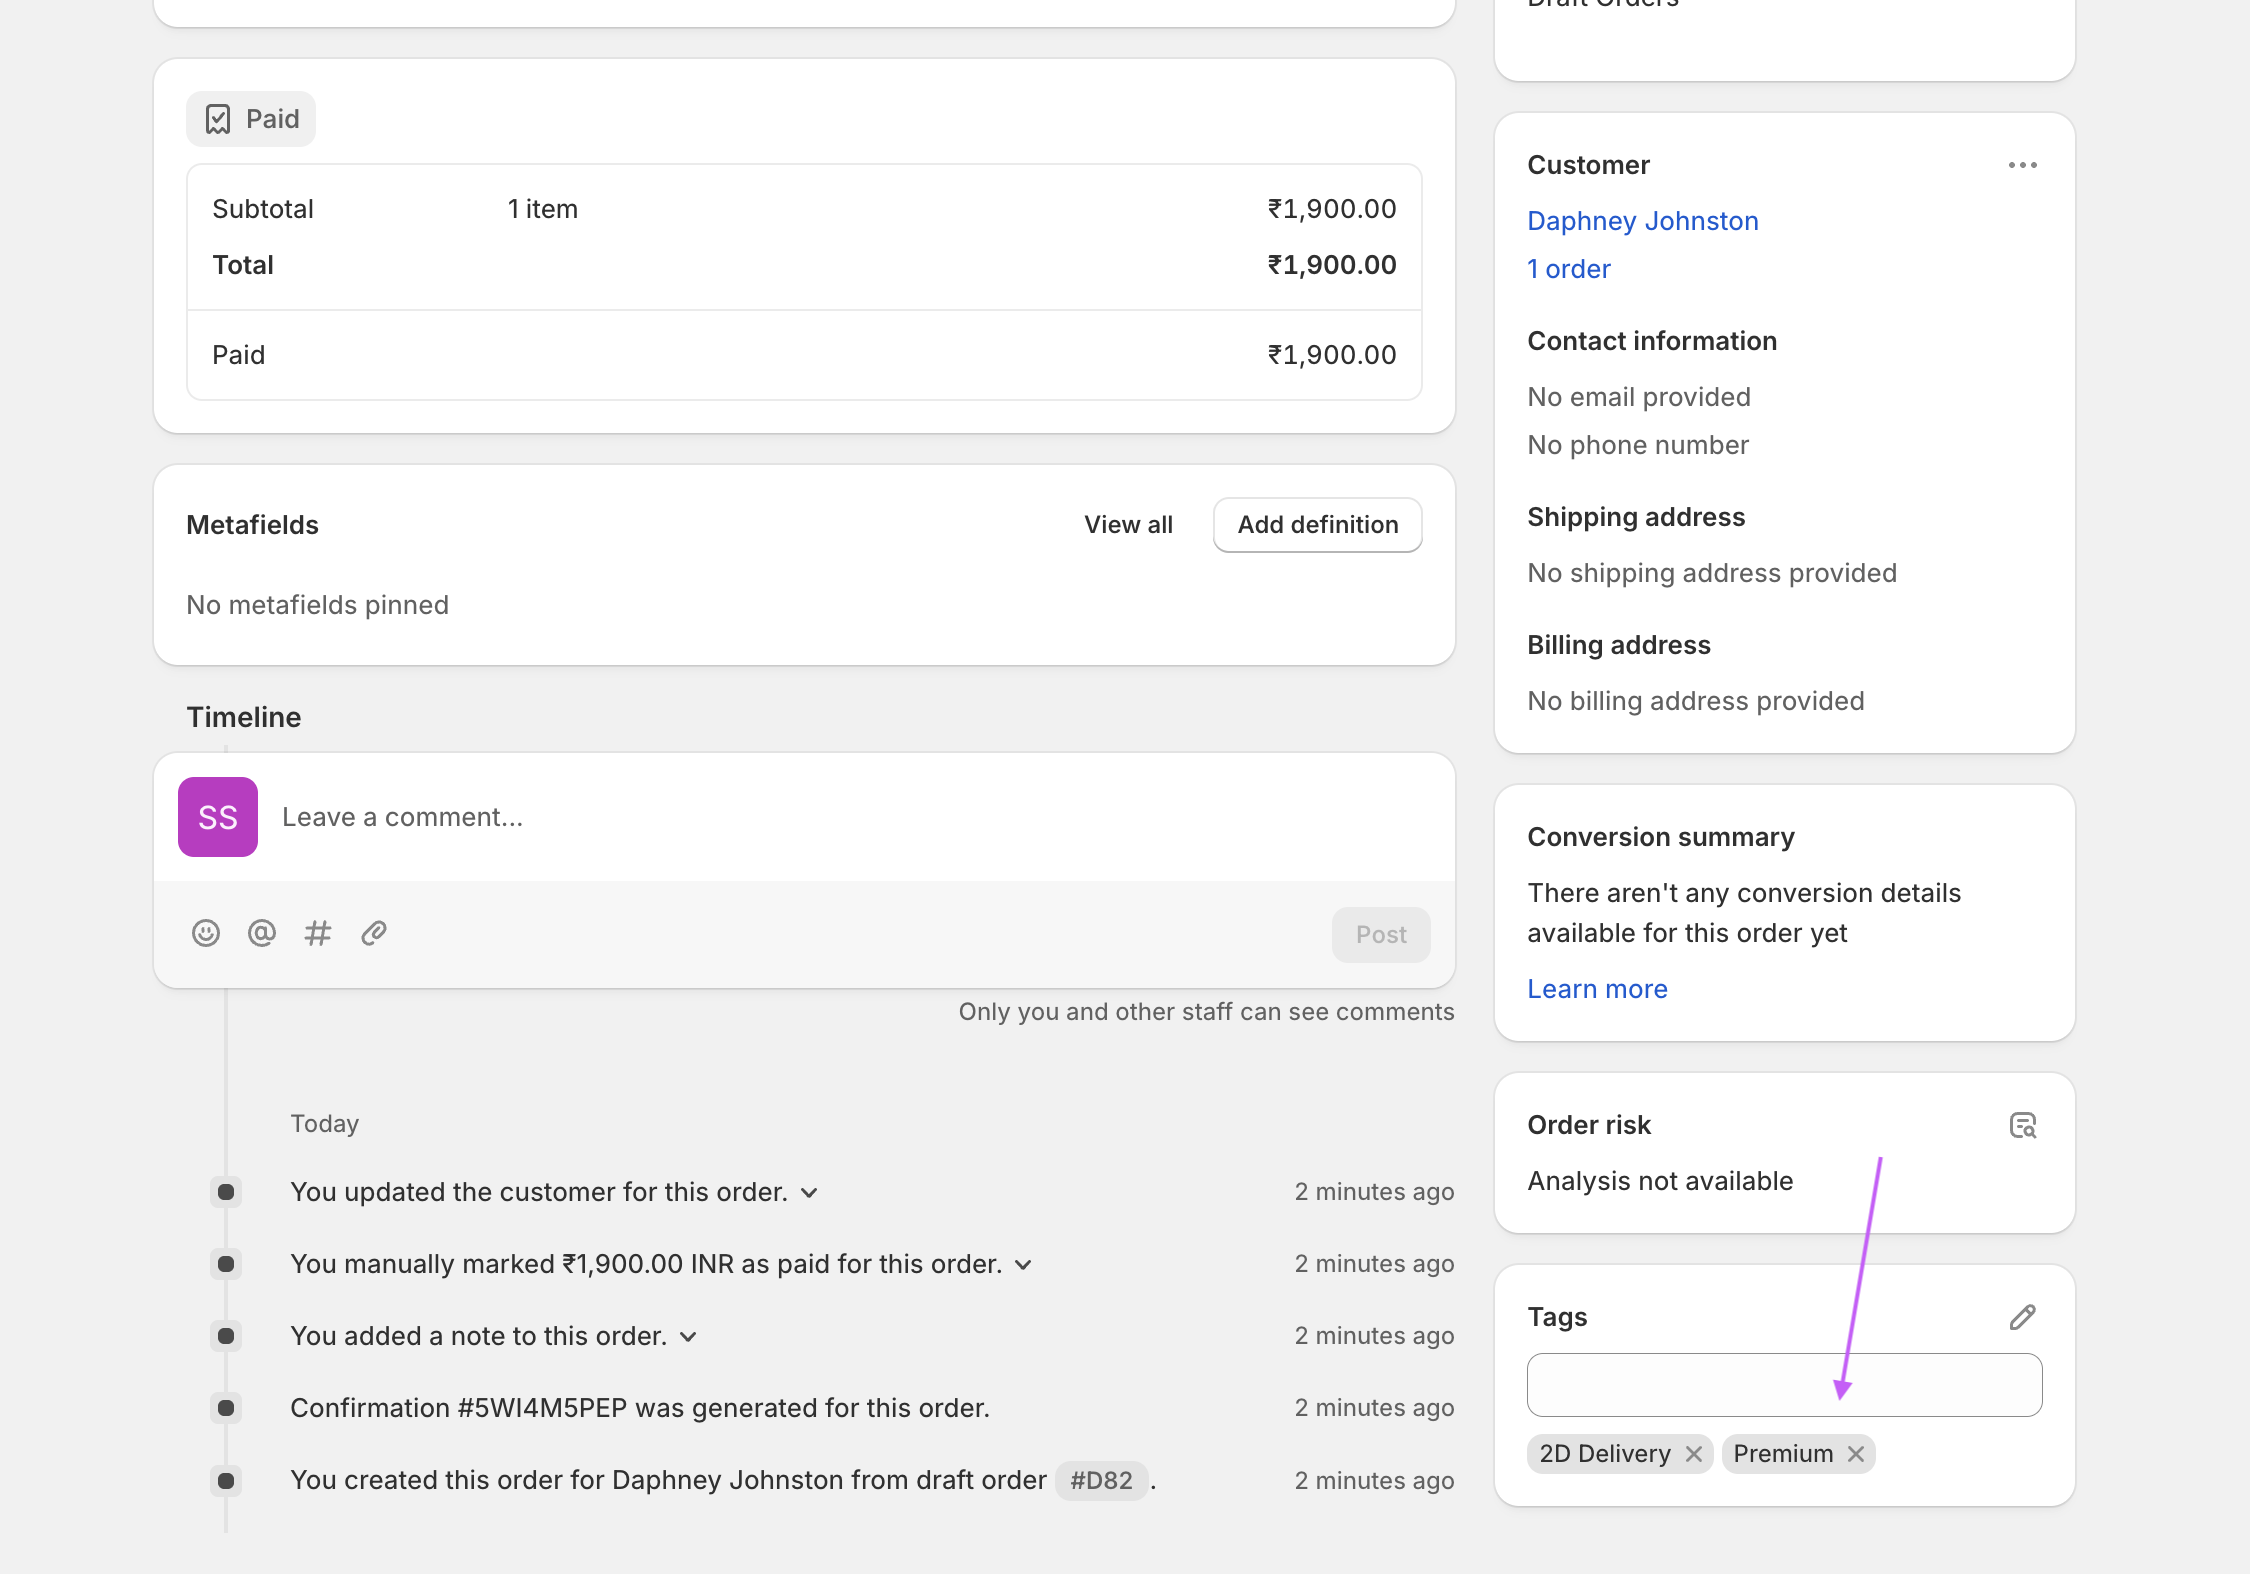
Shopify order detail page with order tags applied for filtering custom work
Shopify order detail: tags live on the order for filtering, not as a place to store engraving text.
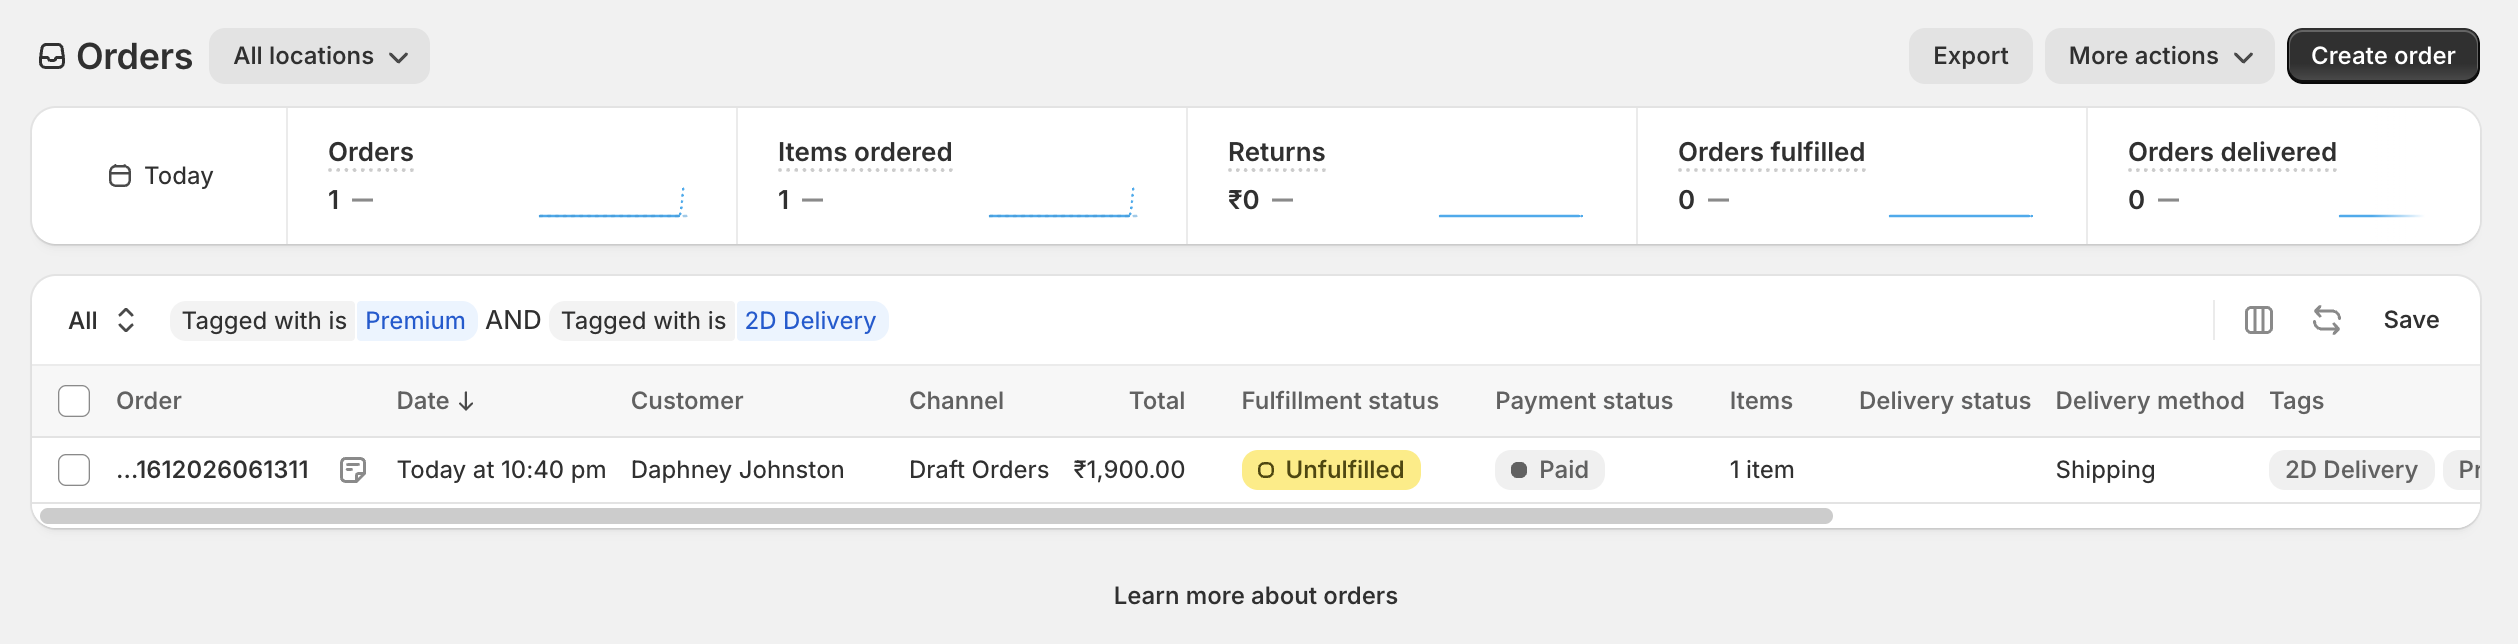
Shopify orders page filtered by order tags so only matching custom work remains in the list
Shopify order list filtered by tag: the morning queue becomes a finite set of custom jobs.
When manual tags take too much time, Shopify Flow helps automate the work as Shopify’s free automation app. Set a trigger for Order created, filter by line item product title, SKU, or tags like made-to-order, and choose an action to Add order tags for custom (Flow action reference). You can also ask Shopify Sidekick to help write the rule. Review the generated Flow before you turn it on, and place a test order to check your work.
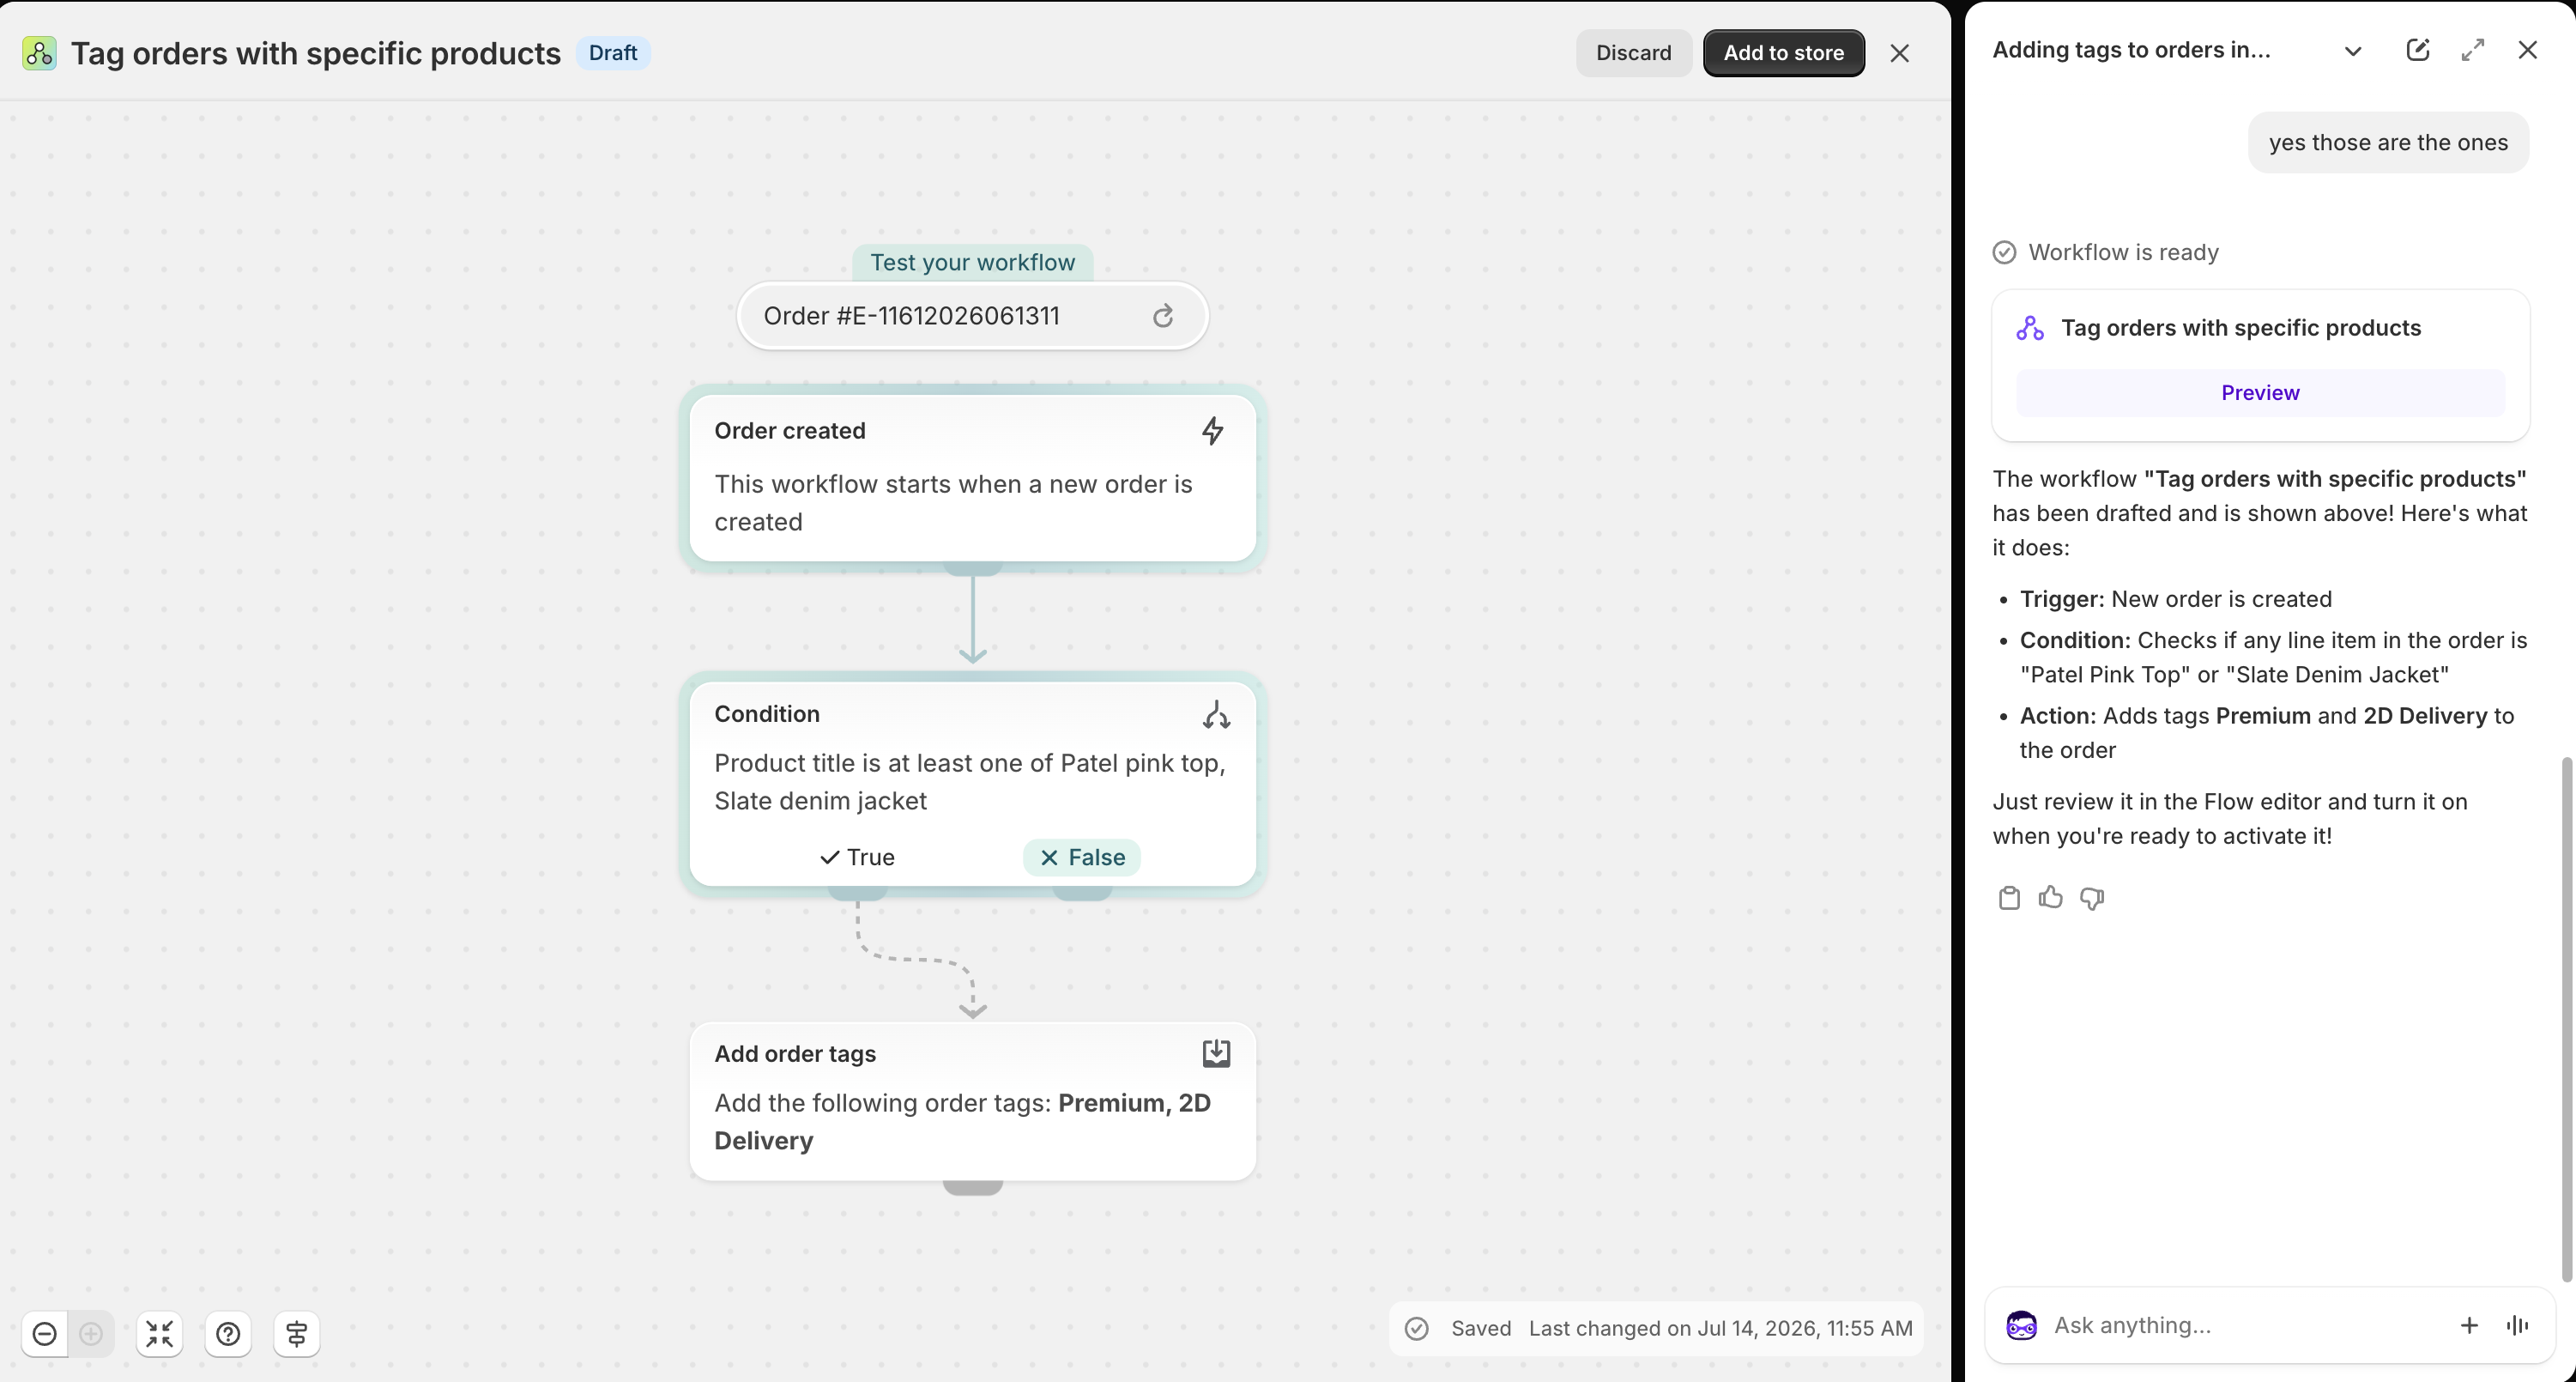
Shopify Flow workflow that tags an order when a line item title matches a custom product condition
Shopify Flow: order created → check line item product title (or SKU) → add order tags.
Any team member can open Orders, filter custom + Unfulfilled, and instantly see active pieces that need bench time.
Step 4. Put personalization on the packing slip
If you have ever searched “how to see order customizations without opening each order”, you might have found advice on the Shopify community forums and reddit asking you to “just print packing slips”.
This only works if those custom line item properties actually show up on paper. Native Shopify packing slip templates accept Liquid tweaks. Many custom sellers rely on apps like Order Printer Pro for bulk printing and layout control. Order Printer Pro supports line item properties by default with no code. If you use a custom template instead, Infinite Options documentation notes you can drop a simple Liquid loop right after line_item.title (Infinite Options × Order Printer docs). Orderline’s free Shopify packing slip templates builder generates that exact Liquid visually for Shopify’s native editor, without coding.
When morning queues pile up, batch select unfulfilled custom orders and print packing slips so bench workers can work from paper without clicking into every individual order. Full walkthrough: How to Print Customisations on Shopify Packing Slips.

Order Printer Pro document example from the public App Store listing
Check the printed paper in your hand against the line item properties on the paid order to make sure they match.
Step 5. Fulfill only when the work matches the line
Open up your main order list, filter by Paid alongside Unfulfilled, or pull up your custom tag. Update an order to Fulfilled only after physical items are completely finished. You can partial fulfill stocked lines while keeping custom lines open on the dashboard.
Here are a few standard guidelines your team can follow for daily exceptions:
- If a buyer changes their instructions after paying, confirm the change in writing, update the note you treat as the record, hold production, and resume only after approval.
- When an order combines standard items with a custom build, partial fulfill stocked lines while keeping custom lines unfulfilled through making and QC.
- If you need a proof approved, tag the order
proof-holdand don’t fulfill until the customer approves. - If a custom price quote came through email, paste the final text onto the draft before the invoice, and treat the paid order as final.
Part 2: Where Shopify hits its limits
When a single maker handles roughly 10 to 15 custom orders a day, options apps, strict draft routines, tags, and Order Printer Pro packing slips keep things moving. Past that mark, you hit walls every morning.
1. You open every order to see what to make
Shopify shows simple receipts. To figure out your bench tasks, you click #1047, then #1048, then #1049. When you get busy, clicking into every order eats your whole morning.
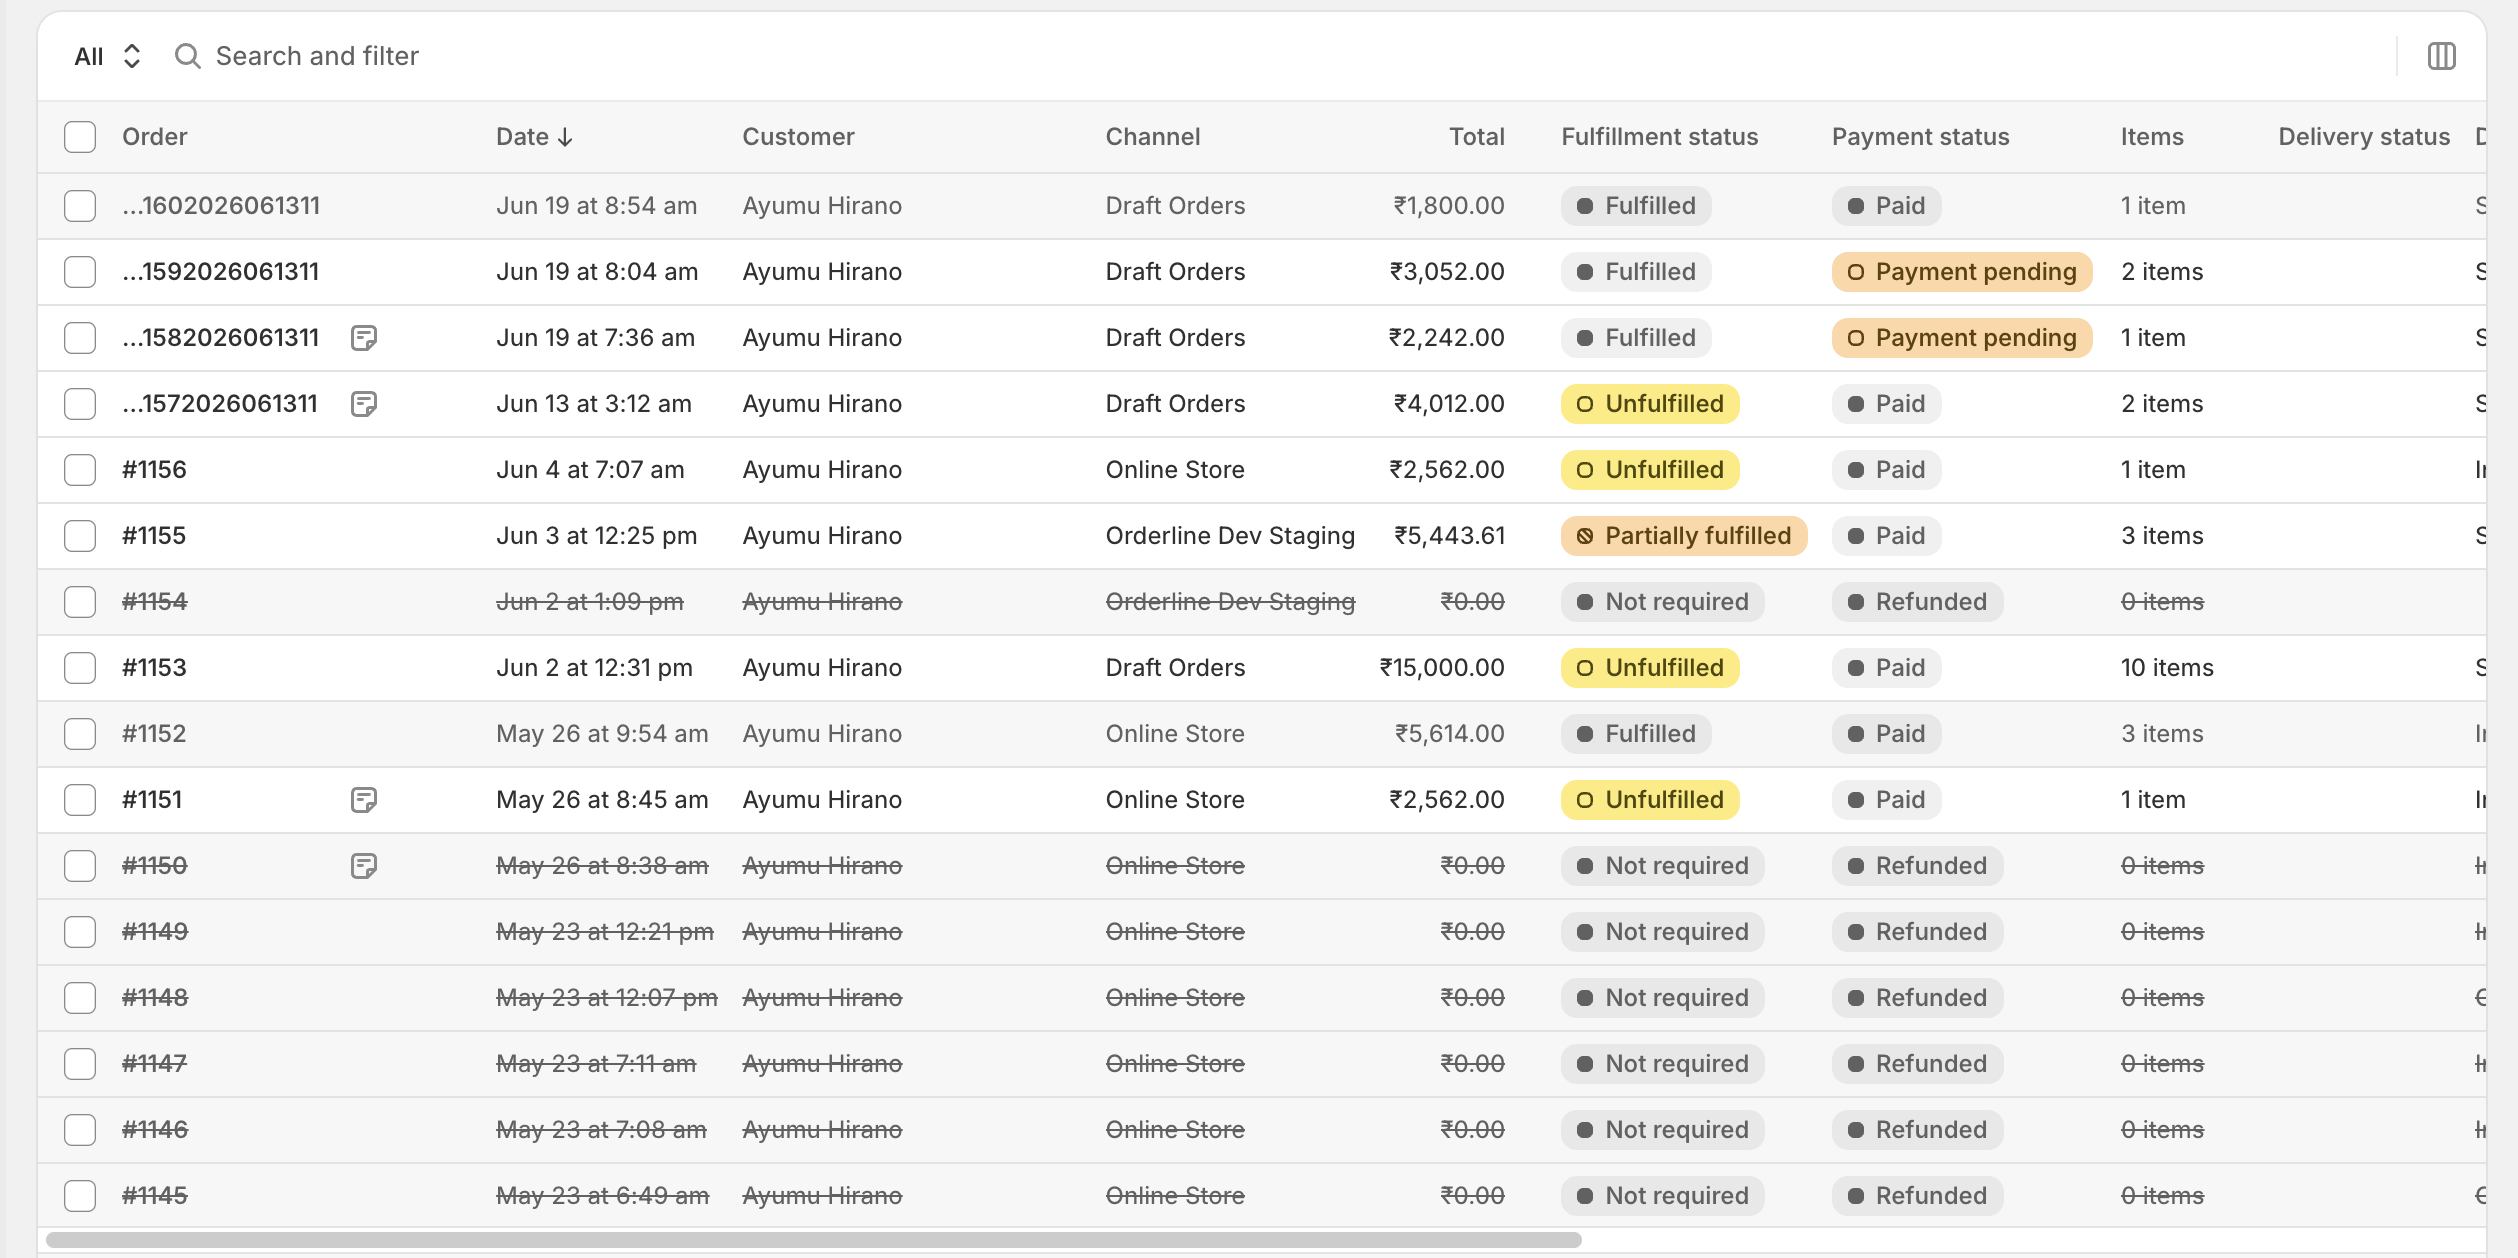
Shopify Orders list showing order number, customer name, payment status, Unfulfilled, and totals without product images or line-item personalization text
Shopify’s Orders list focuses on who ordered and whether the order is paid or shipped, not on what you need to make next.
2. Personalization is not visible on the list
Details live buried inside each product line as line item properties, so they never form a column on your main screen. Hovering items on one order helps a little bit, but you can’t scan 20 orders at once. Two separate orders look identical until you open them: both paid, both unfulfilled, and similar totals. The real difference might be engraving text Noah · 12.04.2019 on one and nothing on the other. Deeper guide: How to See Every Customisation Without Opening Orders.
3. Product images are missing from the list
Makers work best visually. Shopify leaves photos off the order rows entirely, forcing you to click around just to spot the item.
4. “Unfulfilled” does not tell you where work is
In Shopify, Unfulfilled just means the box hasn’t left the shop. It doesn’t tell you if a piece is drying, being engraved, or passing quality checks. Tags like proofing help you sort, but they don’t act as a shared board for your team.
In one big order, different line items can be a different production stage. Tracking needs to happen per product on the order. A furniture client might buy a dining table, 6 chairs, and a high chair, so the chairs could be finished while the table is still getting polished. Deeper guide: How to Track Production Stages in Shopify.
5. Every order gets the same deadline
Your fulfilment staff needs to see which order leaves when to prioritize. Having clear fulfil by dates next to each order helps with that. Shopify does allow you to add a fulfil by column to the orders table. But, it is a one global setting for all your orders, it is not rules based.
This means you cannot set a unique date per order. It also doesn’t sit next to photos or custom text. A rush wedding band and a slow-turn heirloom gift can easily end up sharing the exact same fulfil by date. Deeper guide: Shopify Processing Time and Ship-By Dates for Made-to-Order Orders.
6. Default columns are often not enough
You might already store extra order data like a florist’s delivery date, a wholesale retailer or PO number, a gift note, or any field another app writes onto the order. But Shopify won’t let you turn those custom fields into columns for your daily view. Deeper guide: How to Add Custom Columns to Shopify Admin Orders.
For example, for a florist, it helps to have delivery time, date and shipping location columns in the orders table.
7. Multi-channel sellers need channel views
Shops syncing orders from other marketplaces like Etsy, Faire, Amazon, eBay etc into Shopify to use Shopify as a single source of truth, often need to filter these orders by channel before processing them.
In Shopify, you cannot filter by channel say “Etsy” and create a custom view to not have to apply filters every time you want to see those orders.
8. Pickup store vs workshop
Some shops have a separate pickup location where the buyers get their orders from and a separate workshop or warehouse where the orders are actually prepared.
Shopify often assigns orders to the pickup location. This causes the same orders to be visible to the staff at both the locations. They cannot easily filter out just the orders that need preparation from the orders that are already prepared.
Shopify does have an “In progress” status to partly handle this. But, all the orders are still visible to everyone. There is no way to just make the “In progress” orders visible to the workshop staff and only the finished orders to the pickup location staff.
Take a quick look at your yesterday’s unfulfilled custom orders. Check these five things: can you find customizations without opening each order, is custom work simple to filter, do pack slips have the customizations in them, are orders separated in different production stages, and are you free from spending your mornings opening orders just to re-read properties already on the line? If most of these tests fail at your volume, adding more tags will not fix your shop.
Part 3: What Orderline adds, step by step
Orderline is a Shopify app for made-to-order sellers that brings product images, line items, and custom choices into a single view. It packs custom production statuses, ship-by dates, draft order tools, and bulk packing slips. Orderline works with any product options app like Aco Product Options, Infinite Product Options, etc., metafields, and Shippo (Orderline on the App Store).
Orderline is not a product options form on your website, a customer parcel tracker, or an MRP. Orderline is your production queue that keeps your production work organized in stages and makes it easy for your staff to work on custom orders.
Keep your options app for storefront intake. Use Orderline for everything that happens after checkout.
Step 1. See every order’s details in one place
Each order shows the products, images, personalization, location, and how it ships, letting you plan the day without clicking into every order. Learn the layout with the unified orders view guide.
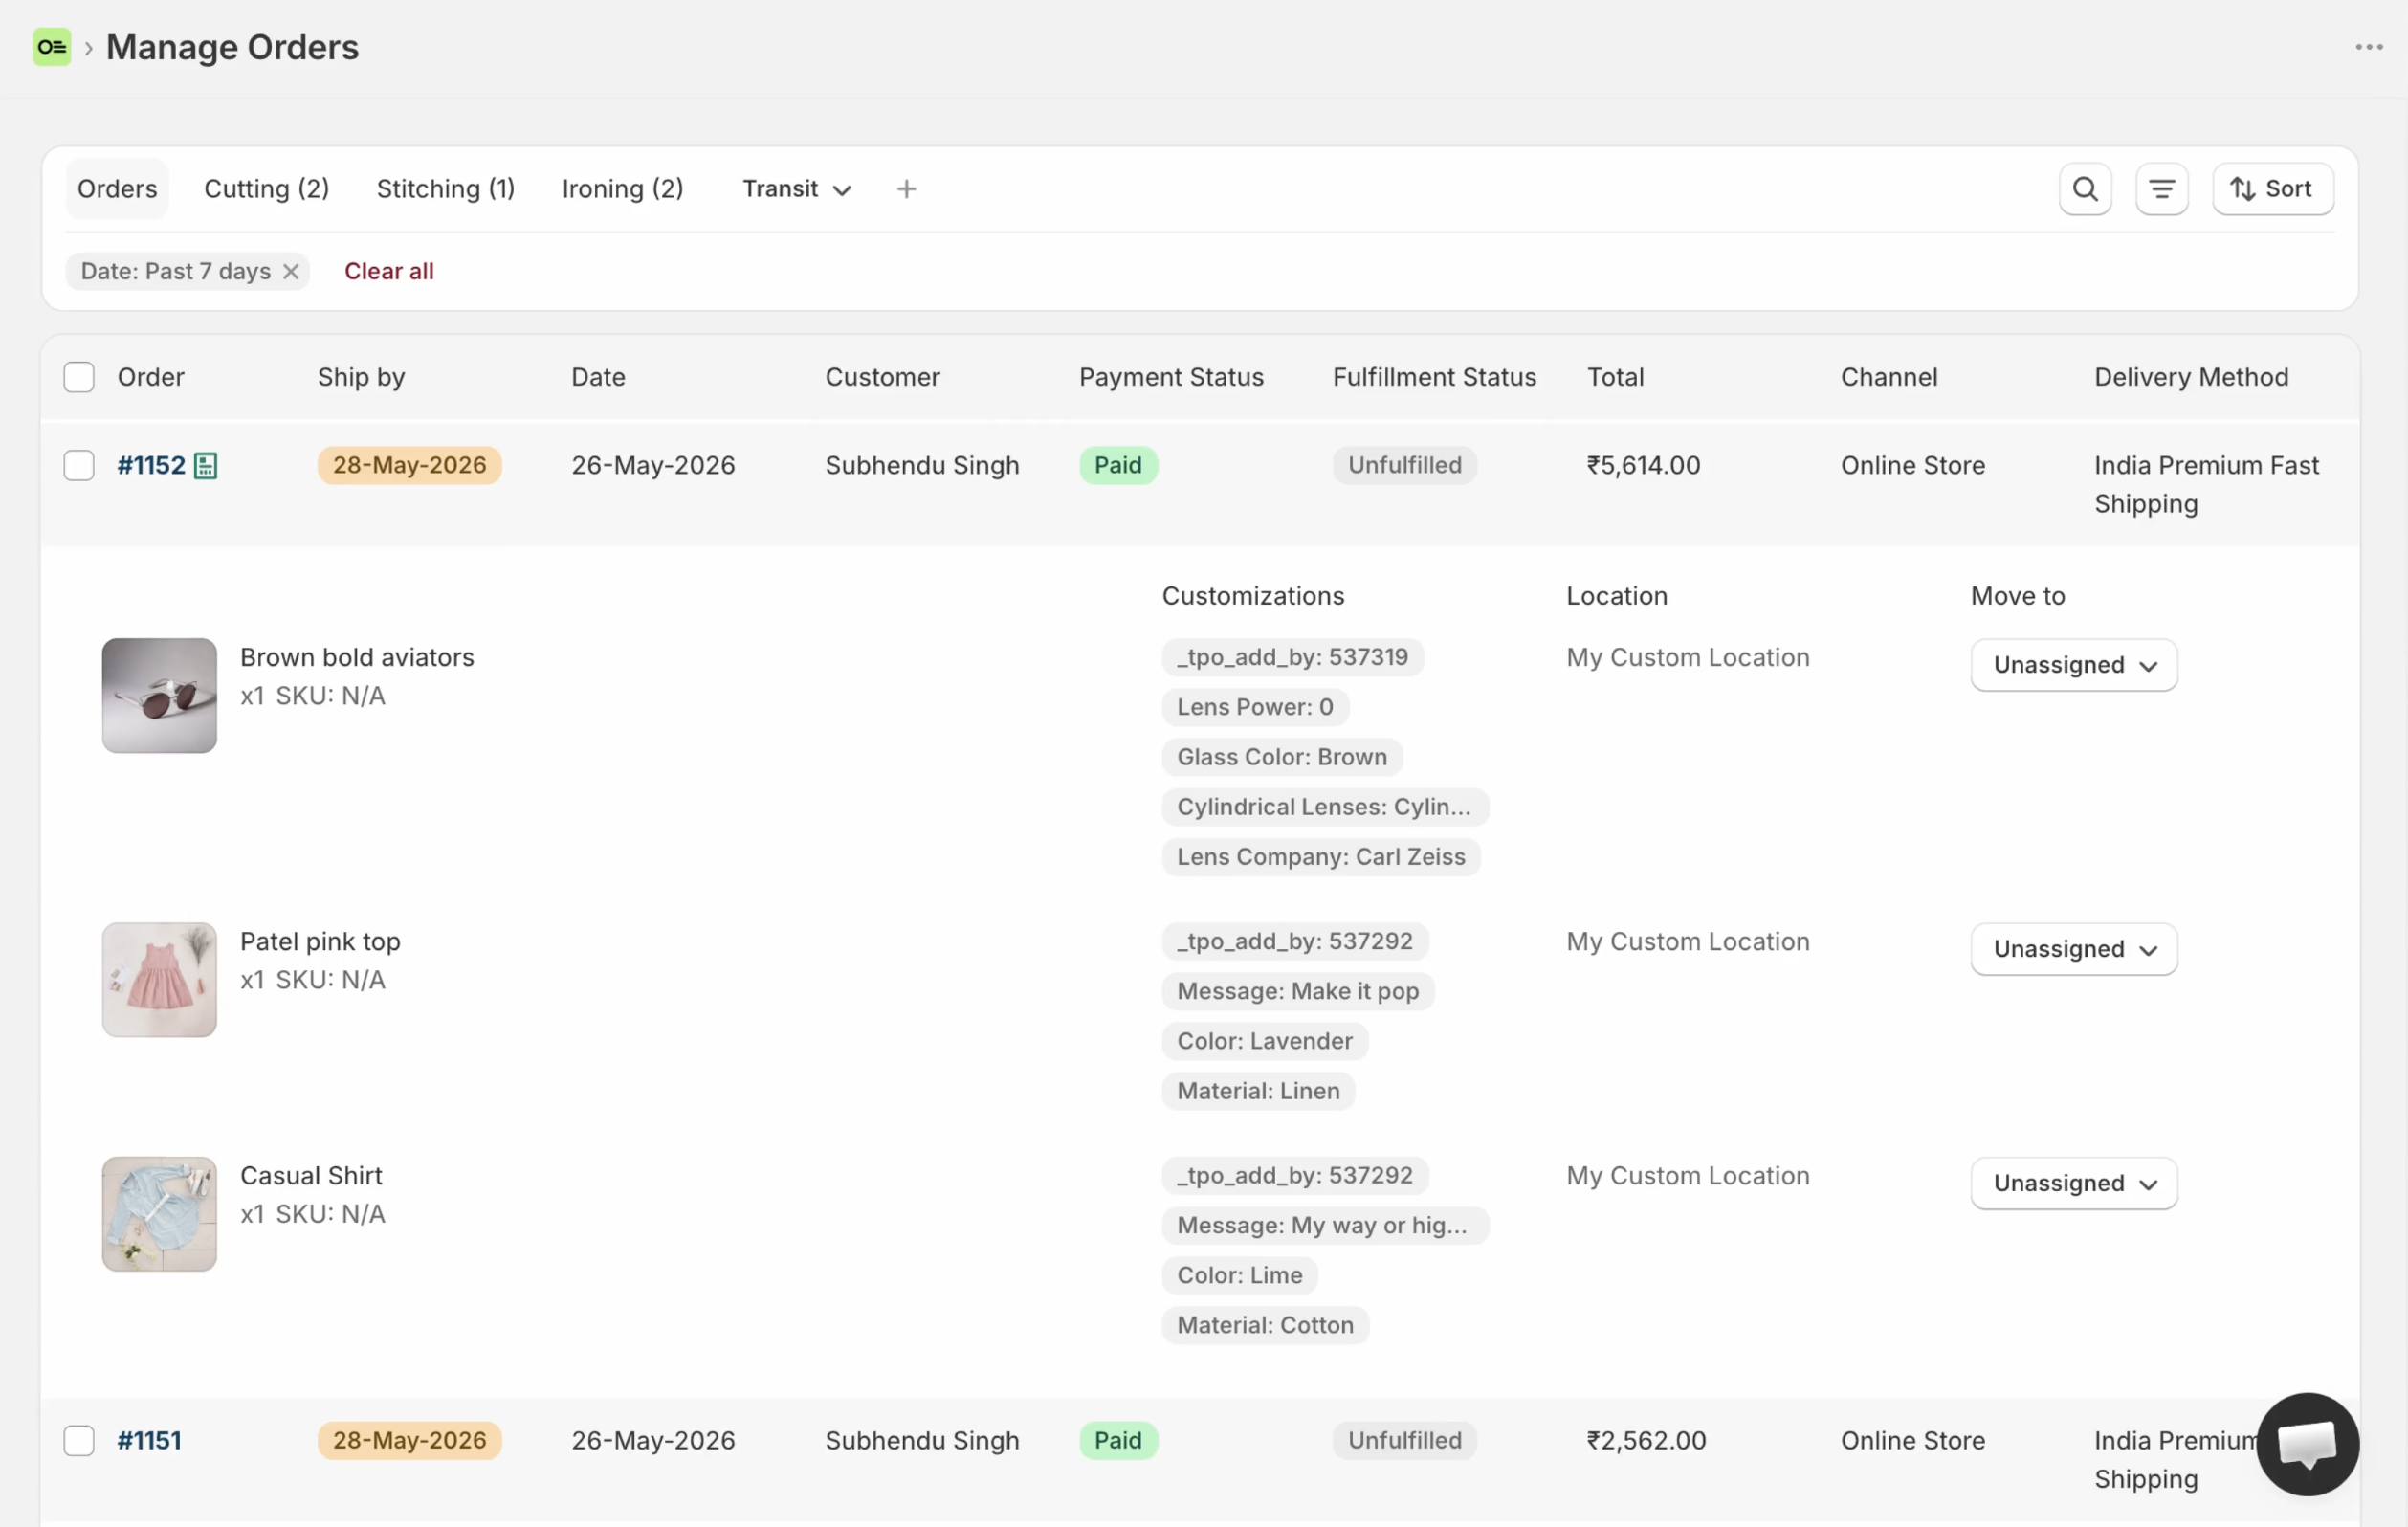
Orders screen showing product thumbnails, products on the order, customer-selected customizations, production status, and ship-by dates in one view
Images, line items, customizations, status and ship-by on one list.
Step 2. Move work through your own production statuses
A jeweler might run Design through Engraving, Polish, and Ready to Ship. A sign shop might run Proof through Cut, Cure, and Ready. You can move entire order or individual line items to different stages. Set up your flow with custom production statuses.
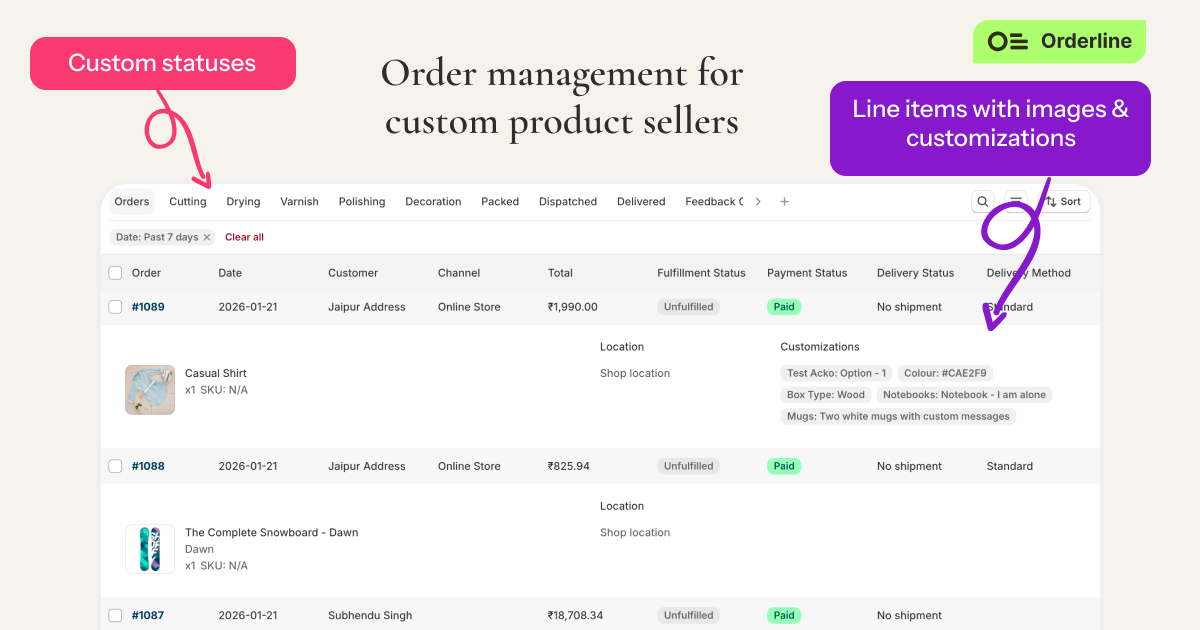
Order list with custom production statuses such as Design Queue, Engraving, and Ready to Ship on personalized orders
Your own stages answer “where is it?” Unfulfilled only answers “has it shipped yet?”
Step 3. Sort by a ship-by date
Orderline adds a Ship By column with urgency colors.
You can set the ship-by (fulfil by) dates in three ways:
- Based on individual product lead time. In the orders with multiple products, lead time of the order is the latest product’s lead time.
- On the basis of shipping methods. For example, orders with “Premium shipping” get 2 days and orders with “Standard” shipping get 5 days.
- Manually on each order one-by-one or in bulk by selecting multiple orders.
Read the setup steps in ship-by deadlines.
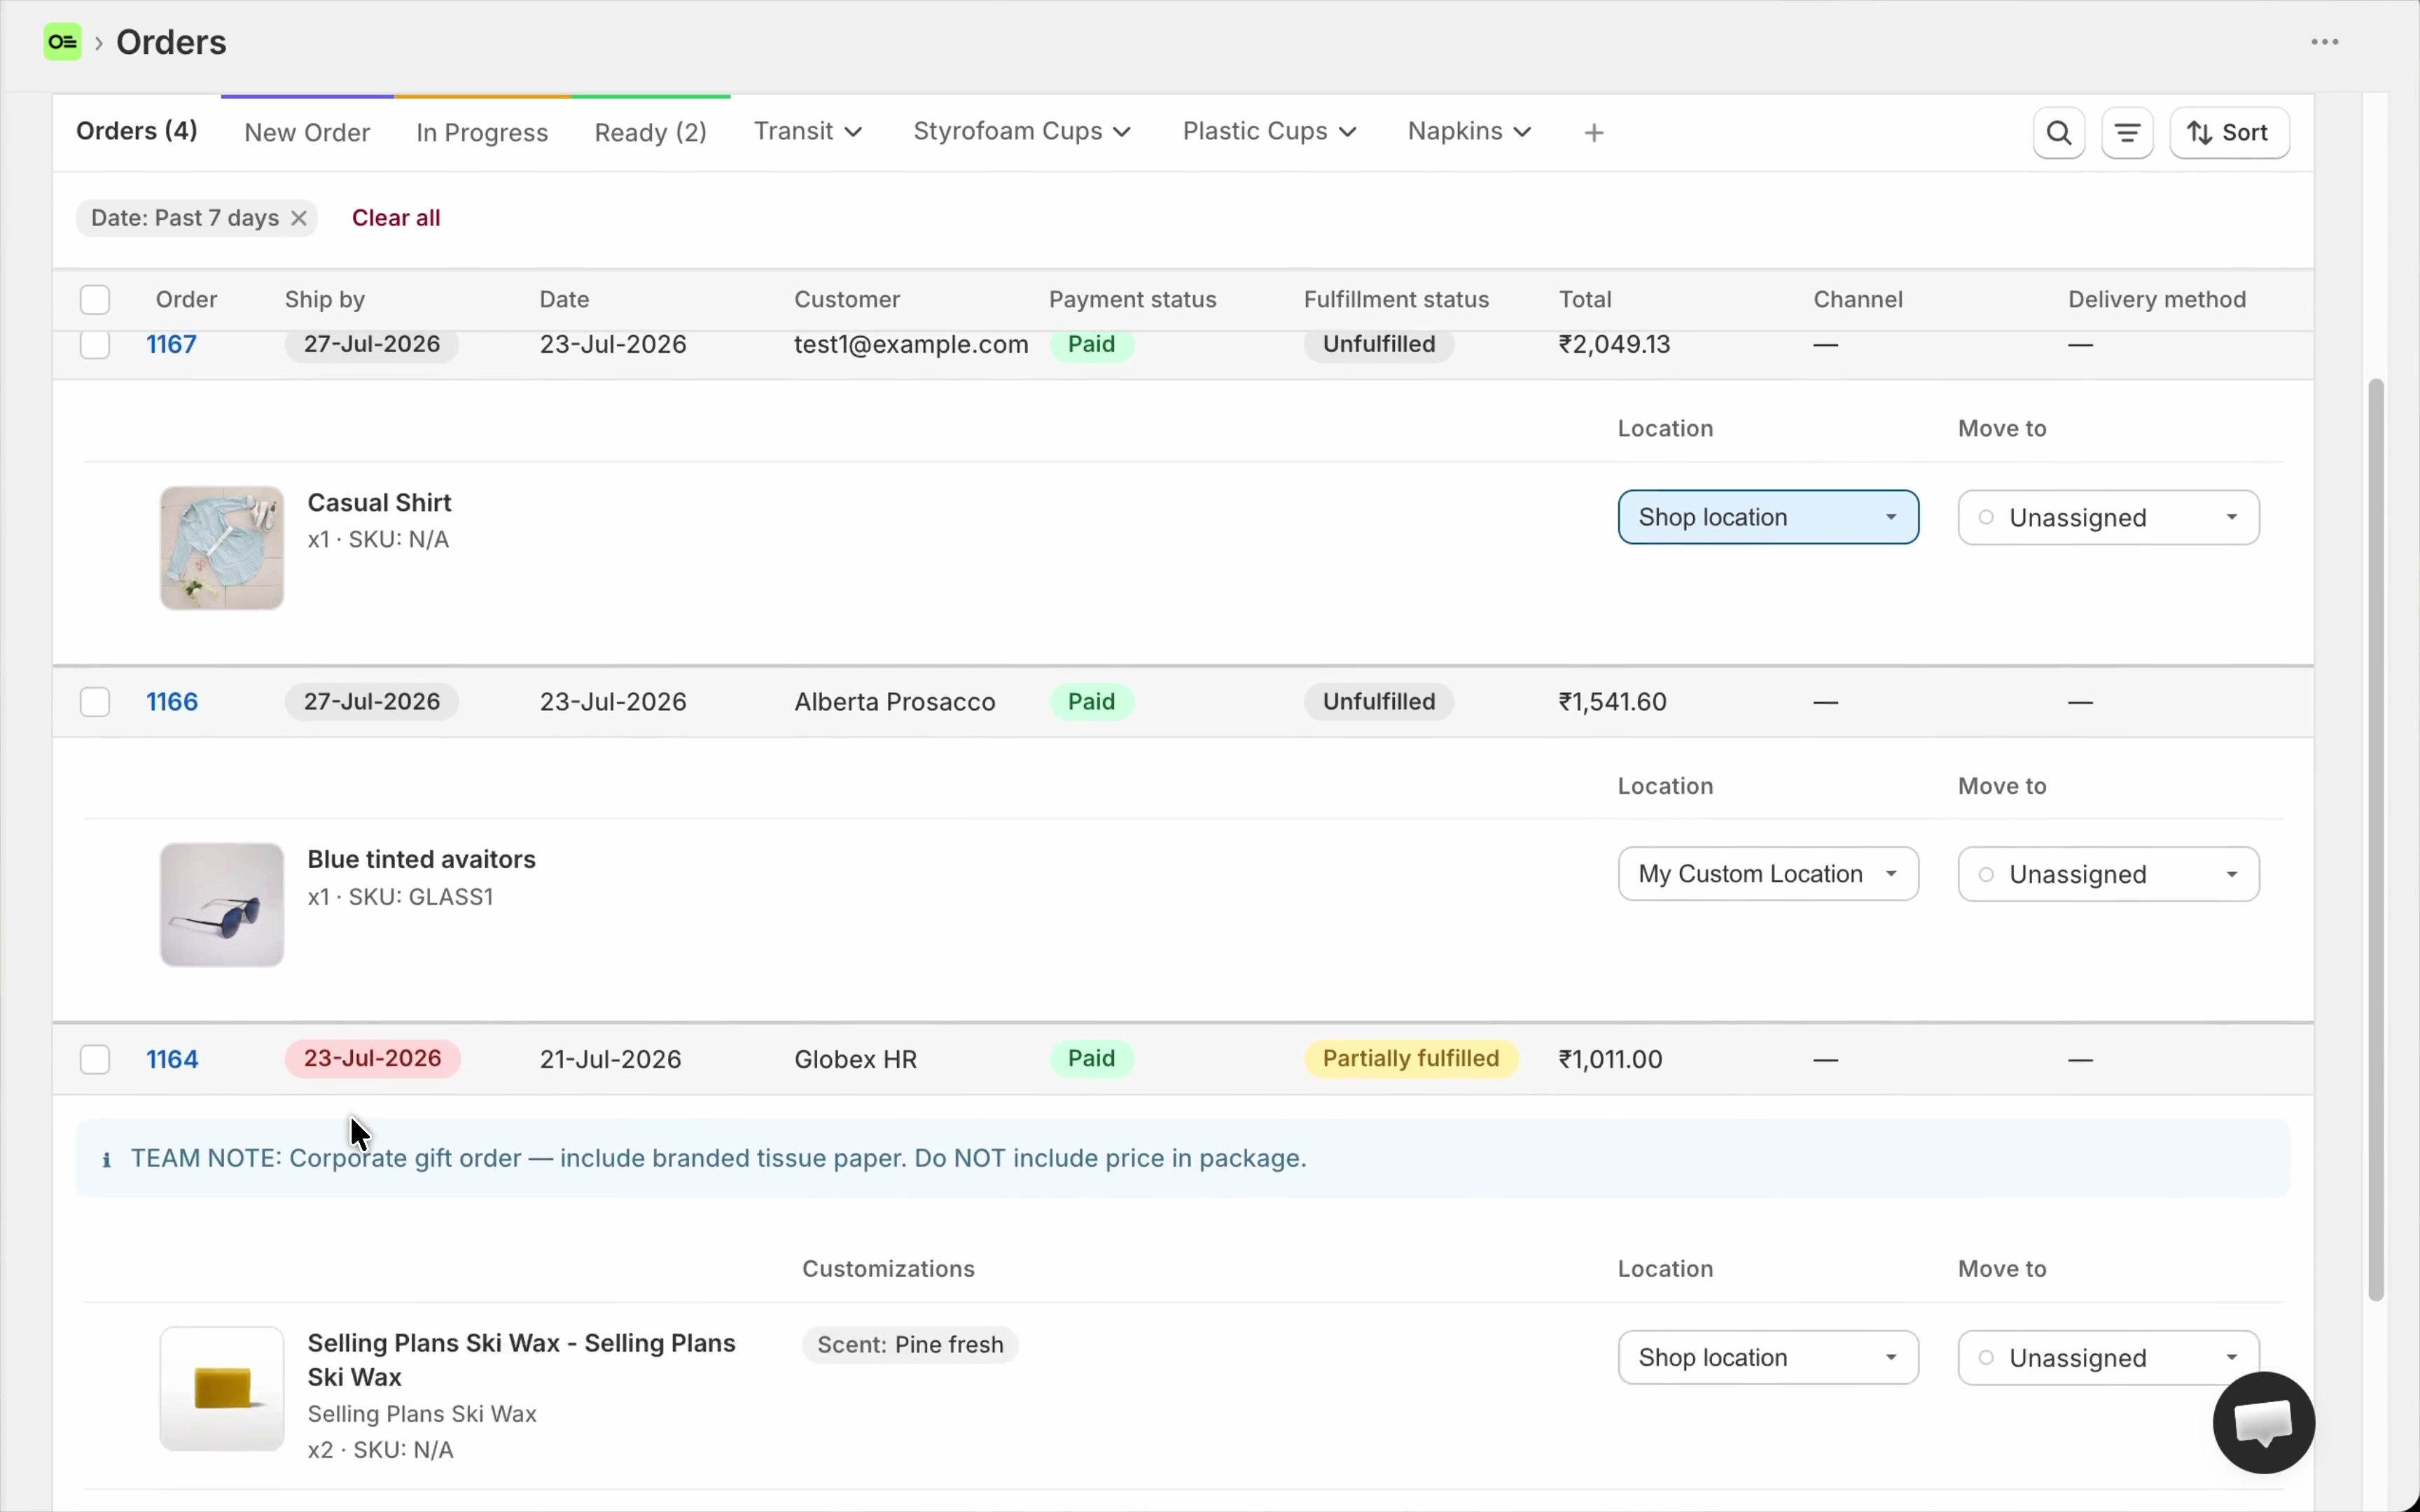
Orders table with Ship By column and urgency colors
A deadline next to the work turns “everything is unfulfilled” into “this leaves today.”
Step 4. Add your own columns
You can build columns straight from order custom attributes, order metafields or shipping address, then filter and sort your view by those fields. For instance, a florist can add a delivery-date column and filter the list down to today. Follow the steps in custom order columns.
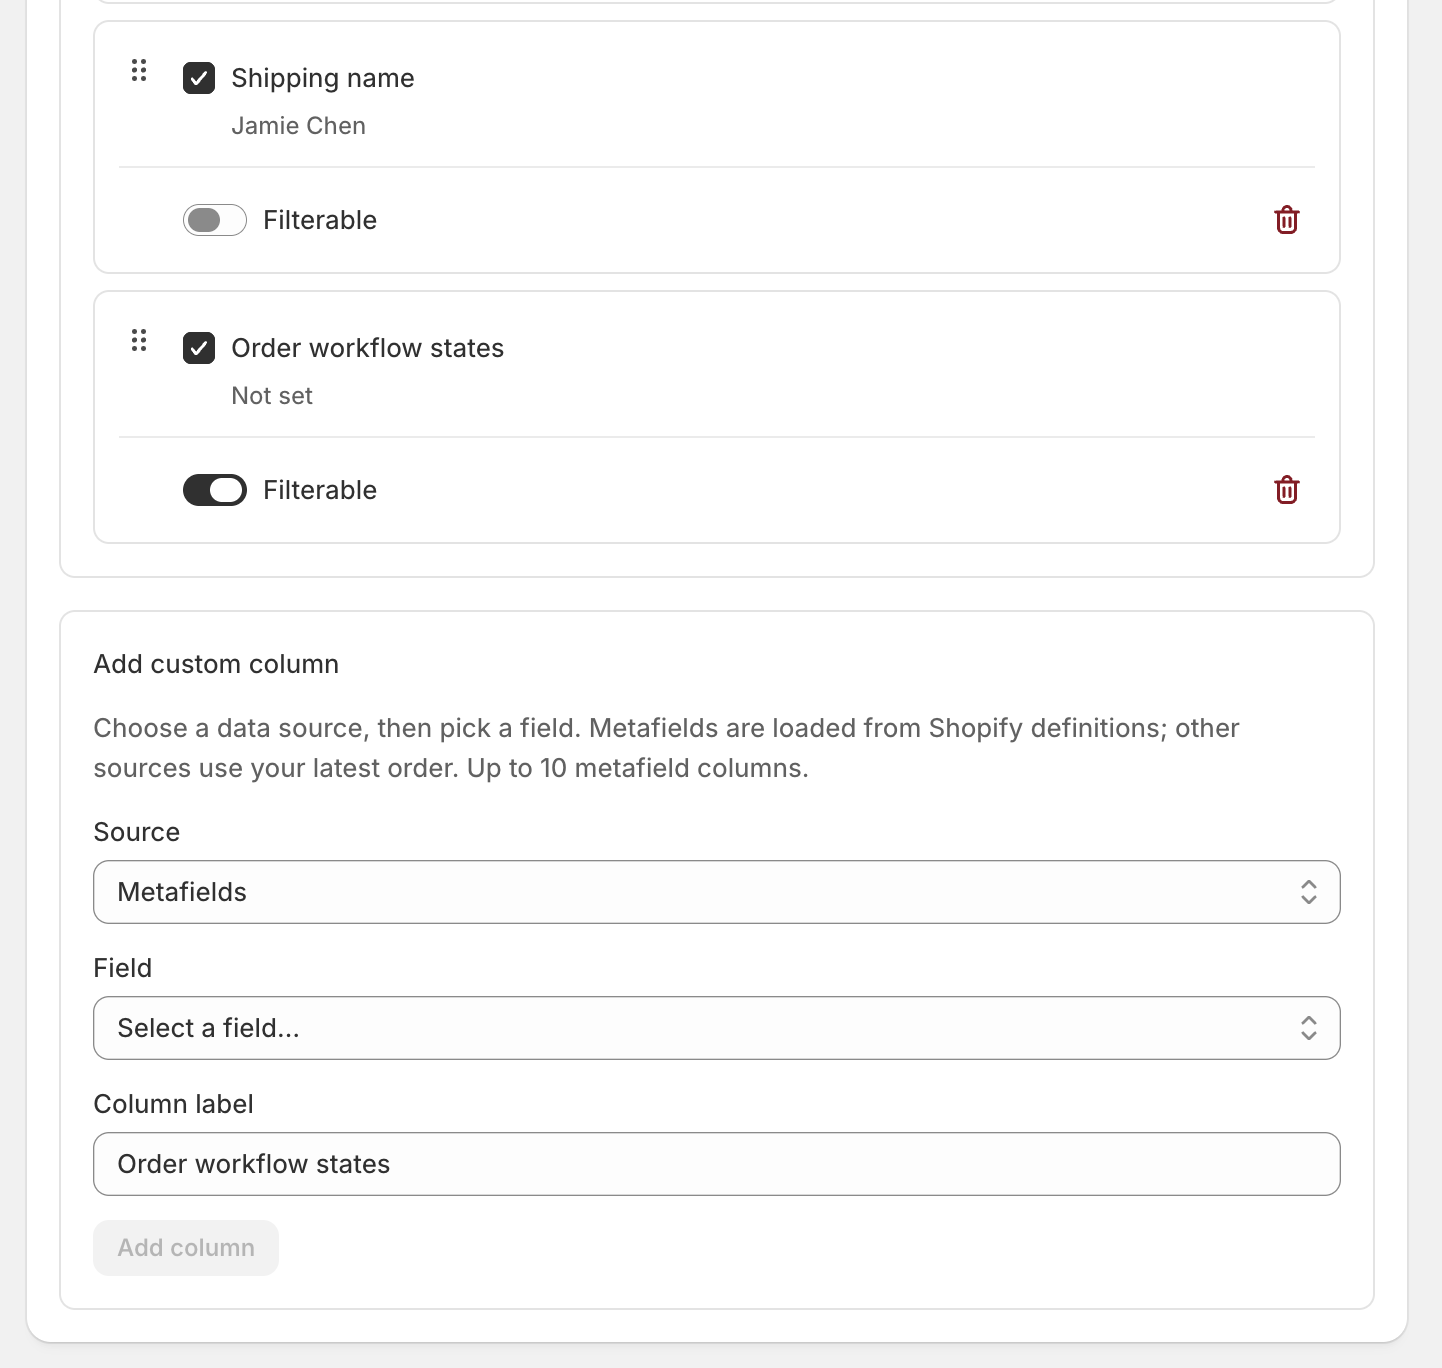
Settings → Columns: metafield custom column (for example Retailer) with Filterable switch, and Add custom column with Source / Field / label
Build columns from the fields your shop already collects.
Step 5. Save views, including by sales channel
You can save custom views like “Etsy work” or “Online Store only” once and reopen them every morning with a single click. Check out custom order views.
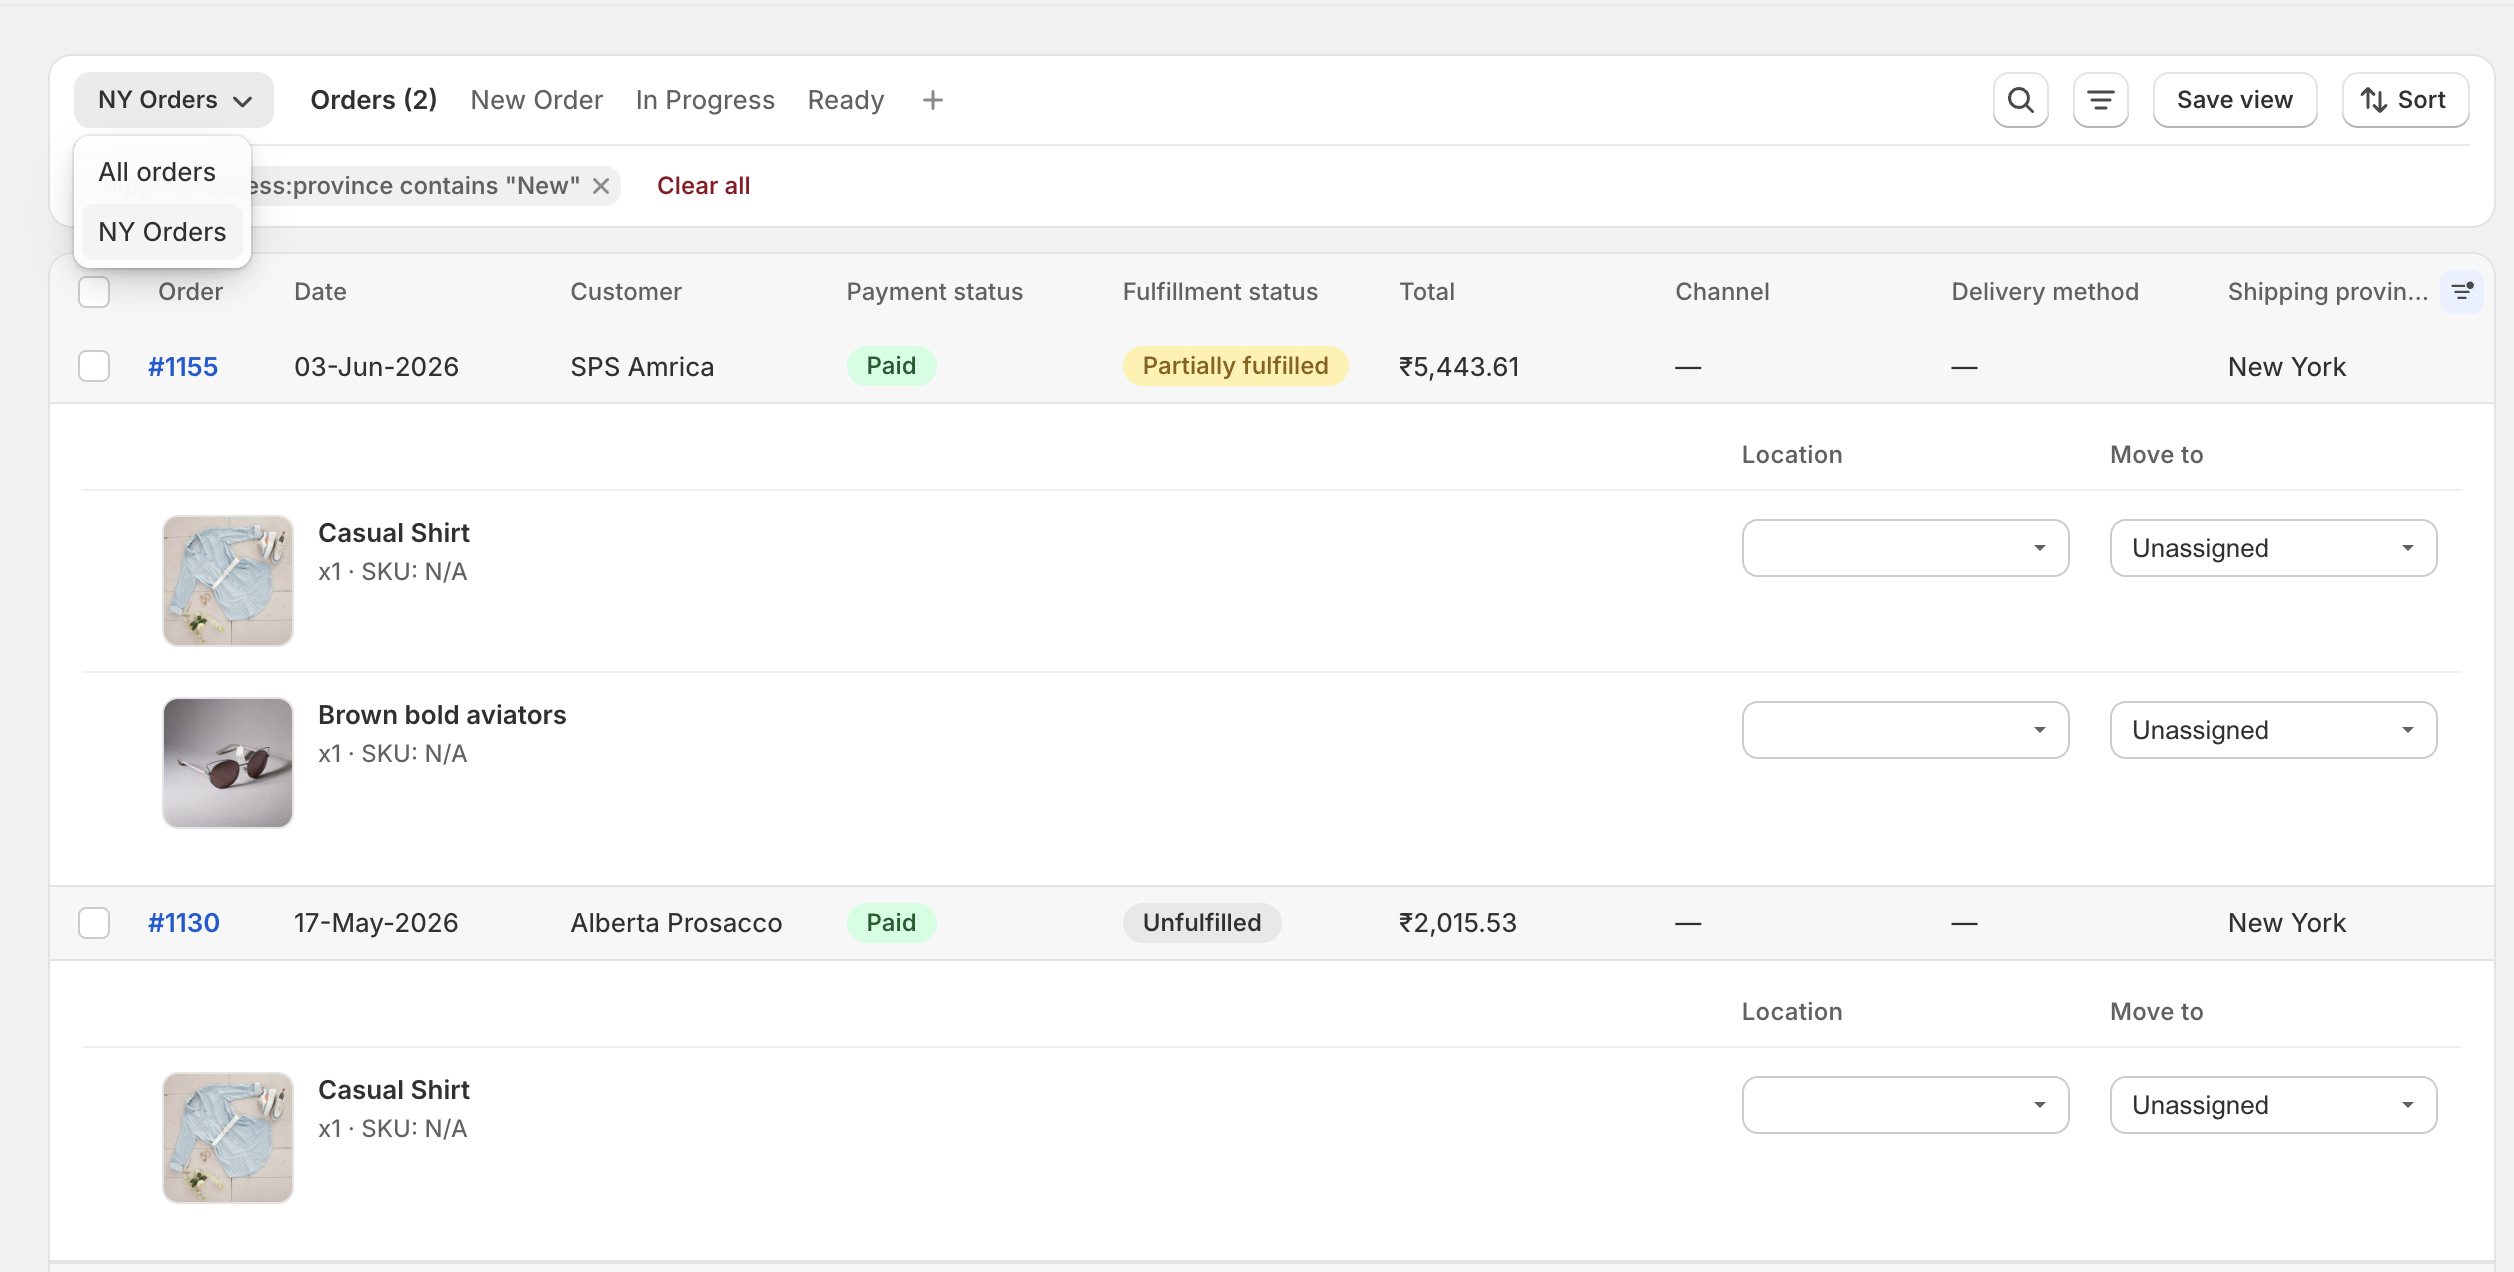
Saved views dropdown showing All orders and named views
Step 6. Route work between pickup store and workshop
Keep Shopify’s location settings intact while you assign orders or individual items internally to the correct manufacturing site. You can also restrict staff members to only view orders for their specific location. Read the guide on staff and location permissions.
Step 7. Print bulk packing slips (Production manifests)
You can customize your packing slips and generate in bulk by selecting multiple orders. You can include details from metafields, line item properties, shipping address etc on packing slips.

Orderline bulk packing slips from the public App Store listing
Step 8. Internal notes on orders
Sometimes, you need to put instructions for your staff on the orders. You can do that in Orderline without syncing them to Shopify.
Step 9. Fulfil directly from Orderline
You can fulfil, hold or cancel line items or entire order directly from Orderline and their status syncs to Shopify.
| Job | Shopify stack | With Orderline |
|---|---|---|
| Collect engraving on the product page | Infinite Options / Aco / similar | Still the options app |
| Offline quote | Shopify draft orders | Drafts in Admin + Orderline draft workflows |
| Filter custom work | Tags + optional Flow | Filters, custom statuses |
| See properties without opening every order | Packing slip PDF | Orderline’s default view with all line items and customizations |
| Production stages | Tags / spreadsheet | Custom statuses on the same queue |
| Pack | Printer app / native slips | Bulk packing slips in-app |
Orderline is your complete production queue. That keeps your custom orders organized in stages and helps you decide what to make, which stage each order is in and what leaves when.
It doesn’t help you manage inventory of your materials or components. To read and judge whether you need a production queue app like Orderline, a MRP software like Katana or an OMS, read our detailed guide in Shopify Order Management Systems for Made-to-Order.
Frequently asked questions
Do I have to click into every order to see what the customer chose?
On Shopify’s own Orders list, yes. The Items column previews one order at a time, and the customer’s choices live inside each order as line item properties, so there is no list to scan. The usual workaround is to bulk-print packing slips into one PDF and read the details on paper. Orderline shows the images, line items and choices on the list instead. Walkthrough: How to See Every Customisation Without Opening Orders.
Does the Shopify order export include the customizations?
Not in the standard order export. The CSV carries order and product columns, but not the customer’s typed choices. That is the gap merchants find after someone tells them to export the orders. If a spreadsheet is the destination, a reporting app that reads line item properties can build it. If the goal is having the choices in front of staff rather than in a file, Orderline shows them on the list.
Can I add production stages beyond Unfulfilled and Fulfilled?
Not to Shopify itself: tags such as design, polishing or qc are the native stand-in, plus the In progress status for partial work. A tag filters a list; it does not show where each job sits. Orderline adds custom production statuses that match your steps, on whole orders or single line items, and keeps them internal so customers still see Shopify’s status. Guide: How to Track Production Stages in Shopify.
Can different items on one order be at different stages?
Not on Shopify. Fulfillment status sits on the whole order, so a dining set with six finished chairs and a table still being polished counts as one unfulfilled unit. Orderline tracks status per line item and can move an item to another internal location without changing what Shopify holds. The chairs can sit at Packing while the table stays at Polishing. Guide: custom production statuses.
Can I set a different ship-by date for each order?
Shopify’s Fulfill by column follows one store-wide processing-time rule, so a rush wedding band and a slow heirloom gift can end up sharing a date. Orderline’s Ship By column sets dates from product lead times, from shipping methods, or by hand, one at a time or in bulk, and close ones carry urgency colors. The date is internal; it does not change the delivery date Shopify shows at checkout. Guide: Shopify Processing Time and Ship-By Dates for Made-to-Order Orders.
How do I print the customizations on the packing slip?
Shopify’s default packing slip leaves line item properties off the paper. You either edit the Liquid template or use a printer app, and Order Printer Pro includes the properties by default. Whichever route you take, print one slip and check it against a real order. Orderline prints slips in bulk from the same list, with the line item properties, the customer note and your internal note on them. Full guide: How to Print Customisations on Shopify Packing Slips.
Can my staff see only the orders for their location?
Not natively: Shopify staff permissions are not location-scoped, so a workshop login can still see every order in the shop. Orderline invites staff to a single location and shows them only that location’s orders, with actions limited to those. This needs a Shopify plan that allows staff accounts. Setup: staff and location permissions.
Do I need an app at all?
If customers personalize items on your product page, you always need something to capture those choices. That can be theme properties or an options app, and it does not change when you add Orderline. Beyond capture, Shopify’s draft orders, tags and Flow rules carry a low volume of custom work. The practical wall sits around 10 to 15 custom orders a day for one maker. Past it, opening every order is what eats the morning, and that is the job Orderline takes over, in jewelry, embroidery, furniture, signs and gifts.
What to do this week
Set up the Shopify stack first, one piece at a time, and test each piece before you trust it.
- Install or fix one options app, place a test order on your own store, and check that every choice you typed lands on the line item.
- Send one offline order through a draft, with the approved details in the note you treat as the record, tagged
custom-quote. - Standardize three tags (
custom,rush,proof-hold) and add a Flow rule that tags custom items automatically. - Print one packing slip and check the properties against the paid order in your hand.
- Run the morning filter on yesterday’s unfulfilled custom work, then check the queue against the five checks in Part 2.
If most of the checks pass, the routine is working. If they fail, more tags will not fix it: trial Orderline with your options app still on the product page.
Related guides
- How to See Every Customisation Without Opening Orders
- How to Print Customisations on Shopify Packing Slips
- How to Add Custom Columns to Shopify Admin Orders
- Shopify Processing Time and Ship-By Dates for Made-to-Order Orders
- How to Track Production Stages in Shopify
- Choosing a tool category: Shopify Order Management Systems for Made-to-Order
Sources
- Shopify Help Center, Order management and fulfillment, https://help.shopify.com/en/manual/orders
- Shopify Admin GraphQL, LineItem, https://shopify.dev/docs/api/admin-graphql/latest/objects/LineItem
- Shopify Liquid, line_item, https://shopify.dev/docs/api/liquid/objects/line_item
- Shopify Help, creating draft orders, https://help.shopify.com/en/manual/fulfillment/managing-orders/create-orders/create-draft
- Shopify Flow, Add order tags, https://help.shopify.com/en/manual/shopify-flow/reference/actions/add-order-tags
- Infinite Options × Order Printer docs, https://shoppad.gitbook.io/infinite-options/display-options-on-shopify-notifications/order-printer-pro-templates
- Orderline guides, https://orderlinehq.com/guides